Atlas Classic
Main Screen
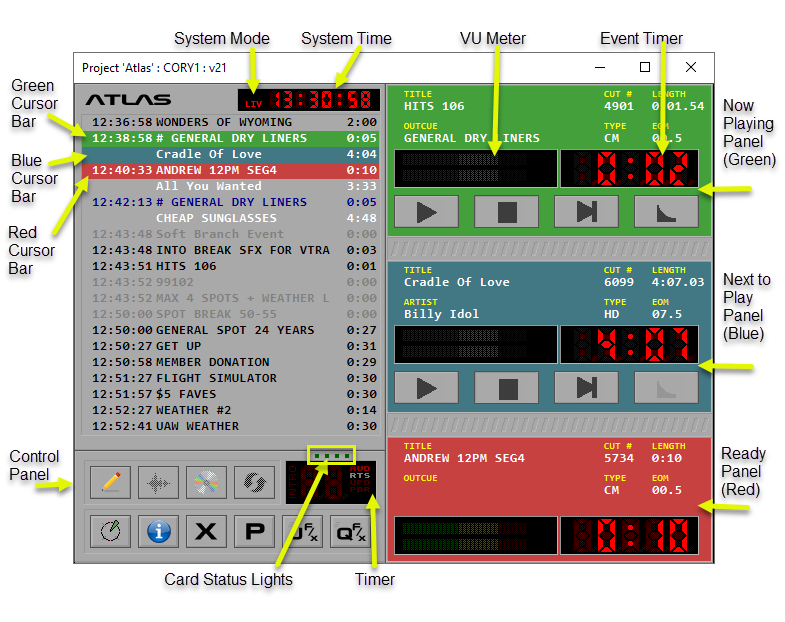
On the computer screen, the three play panels on the right side are green, blue and red from top to bottom. The log panel on the top left is grey with the three lines as green, blue and red which reflect the play panel status.
The control panel at the bottom left displays a series of buttons which are used to access the system. These buttons are identified by familiar icons which make operation easier.
The clock at the top of the log panel displays the current system and system mode of operation, SWP for Sweep Mode, LIV for Live Mode and SAT for Satellite Mode.
The ATLAS system does not limit operator control. While almost everything except event entry during system edit can be operated by a mouse, each function has a keyboard equivalent and many functions may also be operated by and optional external button box using physical logic closures. ATLAS will also fully supports touch screen operation. We suggest the monitor be at least 17" or greater for easy operation.
Play Panels
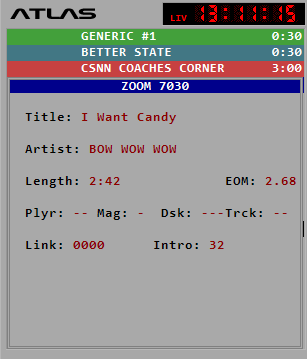
There are three play panels stacked on the right-hand side of the ATLAS screen. They are the event or cart NOW PLAYING (top green panel), followed by the NEXT TO PLAY (middle blue panel), and the READY PANEL (bottom read panel).
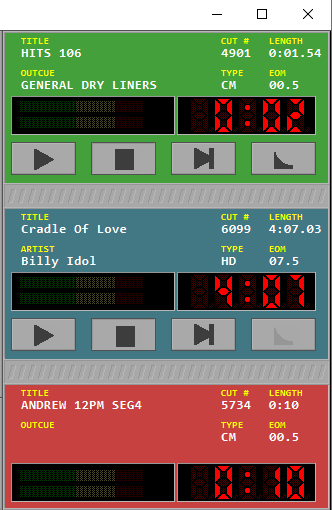
This design is meant to resemble the classic three stack cart playback machine. The top two play panels have individual operator controls. The look of each play panel changes slightly depending on the type of cut or event that is cued now.
As each event is completed and the next is started, the panels change rapidly, moving toward the top or NOW PLAYING position. The panels shown are fora typical station operating in the Sweep Mode.
The information fields can be changed by the user through the EWC.INI file. For example, the TITLE field can the changed to read SONG TITLE.
CAUTION: Contact ATLAS support prior to making any changes to the EWC.INI file.
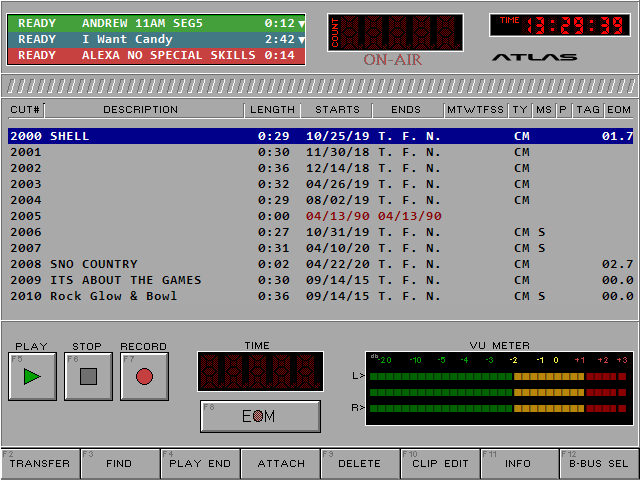
The Play Panel
The panel shows the cut title, the cut number, the cut length, the cut type, and the EOM or End of Message.
If it is "00" seconds long, it means that on this cut there is no end of message to trigger the next event while the spot is still on.
While there is no Sponsor name listed, this may be changed to read OUTCUE to provide the Jock with additional cueing information. With digital audio, a representation of a VU meter is shown.
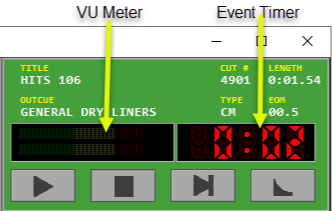
- The VU meter: The VU or level display is in the dark box under the sponsor caption. When the audio cut is playing, the playback audio level is displayed in graphic form. This level display is for guidance only and should not be taken as an absolute level indication.
Event Timer
The box to the right of the VU meter is the Event Timer. Before the event starts, it displays the total length of the audio cut. When the event is started, then it becomes a countdown timer showing the minutes and seconds remaining in the cut.
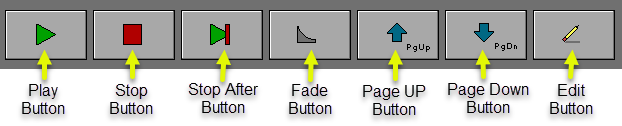
ATLAS Play Panel Buttons
There are four control buttons on both the NOW PLAYING and NEXT TO PLAY panels. The desired action can be started by pressing the button with a mouse, by pressing a function key or a remote push button.

PLAY Button

- The Play Button: If an event is in the top NOW PLAYING panel and the system is in Live Mode operation, then pressing the play button or (F5) key will begin the event. If the Play button or function key is pressed again while in Live or Sweep Mode, then it will stop or fade the event currently playing and move the event in the NEXT TO PLAY panel into the top NOW PLAYING panel. This may also be accomplished by pressing the play button for the event in the NEXT TO PLAY panel. The (F5) function key is active only in the NOW PLAYING panel.
Pressing the (CTRL+F5) keys will start the event in the blue NEXT TO PLAY panel either fading or overriding the digital audio cut in this panel.
Pressing the (ALT+F5) keys will start the event in the red READY panel if it is cued and will skip over the event in the NEXT TO PLAY panel.
WARNING: The stations with more than one card capable of play back operation, moving an event out of the NOW PLAYING panel by pressing the play button in the NEXT TO PLAY panel, (CTRL+F5), or (ALT+F5) will cause the two events to overlap and should be avoided unless this effect is desired.
STOP Button

- The Stop Button: When this button or the (F6) key is pressed, the event is stopped, and the system waits for the next Start command. Pressing (CTRL+F6) will stop play in the blue play panel.
STOP AFTER Button

- The Stop After Button: When the stop after button is pressed on either play panel, it will cause the system to enter the Live Mode after that event is over and wait for further instructions. The (F7) key may be used to place the green NOW PLAYING panel in the stop after mode. Using the (CTRL+F7) keys will place the event in the blue NEXT TO PLAY panel in the stop after mode independent of the stop after setting in the on-air panel. This adds great flexibility for the jock or operator.
FADE Button

- The Fade Stop Button: This button and the (F8) key are active only in the green NOW PLAYING panel. When pressed the event playing will fade out and allow the event in the blue READY TO PLAY panel to advance. Using (ALT+F8) clears any remaining cuts ready to play in the Jock or Quick F/X boxes and returns the system to the regular mode of operation.
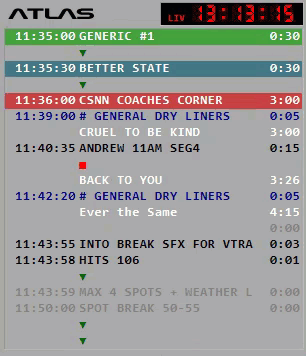
Air Log Panel
The upper three quarters of the left-hand side of the ATLAS screen contains the ATLAS air log panel. The log display panel is placed just under the ATLAS logo and the system time display. The log is the list of events that will be aired by the ATLAS system under operator control.
ATLAS simply plays what is on the log, in sequence. The log can be viewed in two optional expanded formats that will be discussed later.
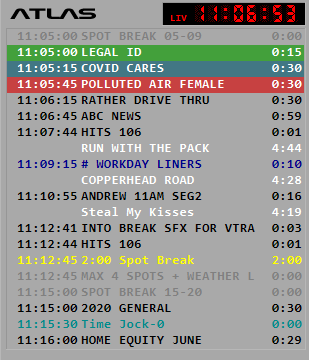
Notice that the three horizontal colored bars are placed on the event NOW PLAYING (green), the NEXT TO PLAY (blue) and the READY (red) event lines. As you may notice, they correspond to the colors of the play panels. Any spaces or events in between these lines will not be aired but are there to give form to the log. The events shown on the log are also color coded according to the following scheme:
- WHITE - songs and HD type events.
- LIGHT BLUE - Time Announce events. (Optional feature)
- DARK BLUE - Rotator type events.
- YELLOW - Cluster Marker type events.
- BLACK - Digital Audio events.
- GRAY - Non-playable events.
Not only does the ATLAS log panel mirror the status of the events in the three right hand play panels, in the edit mode the log may be scrolled by the operator to check on upcoming or previous events and is used by the log edit and goto control buttons below to act as a work space. No matter what else the operator may be doing with the ATLAS system, the three play lines (green, blue and red) of the log are always available on the display.
The log displayed is in the Sweep mode. In the Live Mode the log shows a distinctive marker for the cosmetic space separations. If the space is a red cube in it, this is a signal that event sequencing will end after whatever is playing before. If the space has a green downward triangle in it, then events will sequence through. This lets the log designer create space without creating problems. Any of these spaces may be overwritten with spots or music inserts at any time.
Loading an ATLAS daily log
Pressing (ALT+F2) will bring up a window that can be used to change the currently loaded daily log or to import a new daily log to the list of available logs that can be aired. The log that is currently running is displayed in the loaded window. The bottom window shows the number of logs available and which log is highlighted by the cursor.
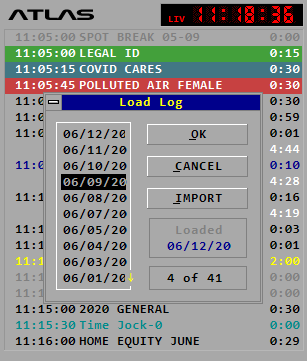
- Load a Log: It is occasionally necessary to replace a daily log that is in use with another one. Use the (up) or (dn) arrow keys to select the date of the log to be loaded and press the OK button or the (O) key on the keyboard.
- Import a Log: This option is used to import a log from a floppy disk into ATLAS (aka "sneaker net"). To use this option, the import location of the log must be set up in the EWC.INI file under [PATHS] at the ImportLog=A line item. The log must also be in a format that is compatible with ATLAS. Insert the disk with the log you wish to import into the computer floppy drive and press the import button on the overlay screen or the (I) key on the keyboard. The load log window will be replaced with the import log window. Simply follow the instructions on this window and your log will be imported into ATLAS.
General Log Editing
We assume that you have loaded or created a log and that it is now in the ATLAS system and is showing on the left side of the screen. In this case, just assume that your traffic person has loaded it last night, before you came on duty. By pressing (F9) or the edit icon, you can edit that log. The only things you must remember are that you must either use an empty space on the log, insert a blank line or overwrite an existing event. If you want to pick a digital audio cut or edit into the log, press (F10) to display the Select Digital Audio window. Then use the mouse or the (up) or (dn) keys to highlight the digital audio cut you want to place onto the log. Press (enter) or click the SELECT button in the window to place it onto the log. Rotators and Macros may also be entered in the same way. Press (esc) or the right hand button on the mouse to close the window. If you have hard disk music in your system and have a database from a compatible music play list generator, you can edit in new songs or cuts by pressing (F11) to display the select song window. The information in this box can be sorted and then displayed by Title-Artist, Artist-Title, or Length-Title by selecting SORT with the mouse and highlighting the option you wish to sort by and then pressing (enter). Then use the mouse or the (up) or (dn) keys to highlight the song you wish to select. Press (enter) or click the SELECT button in the window to push the song onto the ATLAS edit log. Press (esc) or the right mouse button to close this window.
You can flip back and forth between the scrolling edit screen and select digital audio / select song screens by just pressing the tilde (~) key.
Direct editing is even easier: If you know the audio cut or song title number that you want to place on the log, then go into edit (F9) and just type the cut number and press the (dn) or (enter) key to go on. Even the real time at the far left of the log screen can be edited by using the (tab) keys. Another method of direct editing can be accomplished by finding a cosmetic space or song avail, pressing (c) or (+) and then entering a song number. DO NOT select an event on the log that is already filled. Doing this will cause an overwrite and a digital audio index number will be entered in place of the song.
WARNING: ALL editing of the log currently running must be done utilizing the air log in (F9) edit mode. Editing the current log through the production computer and then transferring the edited log over the LAN or by importing it from a disk or by using the control room log editor will result in severe problems with ATLAS.
Adding Time
Any event or line on the ATLAS log can have a time (hours, minutes and seconds) tag added to it. When in the edit mode on a line, then press (tab) to move the editor into the time columns on the far left. Enter the time that you want, then press (tab) again to return to the regular edit mode. In normal operations, the time display is for reference and may have been downloaded from the traffic system. However, in the Sweep and SAT modes of operation, these times may be used for update points to control the flow and content of the music or other program features.
ATLAS Cut Index Codes
ATLAS uses a set of numbers called a Cut Index ranging from 0001 to 9999 to identify audio cuts, pieces of copy, user log titles, and control codes. Don't worry too much about these, there' very easy to use. Here are a few of the most used:
- Spot Avails (0004-0009): This is basic. Reserved Avail markers are the locations on the log that are reserved for spot sets. These avail sets can be placed at random with only relative time or they can be displayed with a time on the Master Log. However, most users will place a cluster marker with a time entry at the beginning of a spot set. At the beginning, just use cut number 0004 as a standard avail marker on the log. Spot or cut avail codes of various priorities. In most cases, just use 0004 unless you need a special avail marker.
- 0010: (Form Feed) (Optional) This cut is totally ignored on the log screen but forces a printer to a new page when it is encountered during printing. If you are not going to print your ATLAS logs, then this cut is not necessary. This code is produced and used by the Traffic-to-ATLAS interface as well.
- 0011: A standard cosmetic space. Also used as an implied sequencing stop when in the Live mode. Shown on the log as a red cube.
- 0030: Cut number "0030" is a special cosmetic space used for log formatting that is ignored by the system in the Live, Sweep and Auto modes. It is used primarily for spacing out the log and to leave spots to edit into if required. In the live mode, it is shown as a green downward triangle.
- Cluster Markers (0051-0075): These reserved titles define the beginning point and length of each spot set for use in the ATLAS system. They can be located on the ATLAS log with or without a time as desired. Cluster markers should always be used in automated segments. There are two types of cluster markers: the most common is the option type (MK) which may or may be filled and the must fill type (MF) which requires that the ATLAS system automatically fill the spot set to avoid the consequences of a dead break getting on the air. These designations are placed in the type field of the cluster marker. These cluster markers are used to show spot set length. Useful, but not always required for ATLAS. They will however, be used in some advanced versions of ATLAS for better format control. Cluster markers are required for Satellite systems for spot set time control.
- Control Titles (0001-0299): These reserved titles are used to send signals to external controls or to make some special operation happen inside ATLAS. For example, control titles 0013 to 0015 are used on the log to switch modes between Live, Satellite and Auto modes. Control Titles are not always required. Before adding any control titles, always check with ATLAS support for advice.
- Jock Schedule Sensitive Cuts (0291-0299): These cut numbers are reserved for Jock Schedule Sensitive cuts. When one of these cuts is placed on the ATLAS log, these control cuts essentially duplicate the effect of the satellite closures or other programmed cuts. For example: If external closure #1 has been programmed into the system to start a rotation of ID audio cuts, then this same action will result when the cut number 0291 is encountered as an event on the ATLAS log. These special calls or cuts are especially useful in automated music operation because the cuts will follow the jock schedules to bring up the right voice at the right time.
- User Titles (0300-0399): These titles which are in the cut index area from 0300 to 0399 are for any non-audio or non-copy use you wish. Generally, they are used to create a title that can be displayed on the ATLAS screen. These titles are just for use by the operator. They can be names of programs, reminders or for any other useful purpose. User titles are NOT required and need only be used if the station wants them. They add depth and readability which is especially important in Live or Live Assist periods of operation. They are not necessary as you begin to learn to create logs.
- Macros (0400-0449): Essentially a macro is a mini-log that can have up to 20 events. In general, anything that can be run on a regular log may be part of a macro. A macro can be used any number of times. Macros are ideal for handling complex switching from one audio networking to another, for involved transitions from music to satellite or vice versa, and for the special group of real time events that must be executed with precision. Macros can be in rotations on jock schedules and jock f/x too.
- Special Fill Rotators (0450-0499): These rotators are used to set up rotations of commercial, promo or PSA spots to eliminate the necessity to track multiple cut index numbers when assembling a daily log. When used as substitute tables, they can automatically replace a spot that is out-of-date or doesn't exist with one of the same lengths from a special set of substitute files. They may also be used to "fill" spot sets that don't have enough spots to meet the minimum set length time requirements.
- Cut Rotator (0500-1999): Any related group of audio cuts may be placed into a rotator with a specified ID number. When this number is played on the log, the next legal audio cut will be aired or displayed. Rotators are created and maintained in the ATLAS Production system.
- Audio Cuts or Live Copy (2000-9999): These numbers are used as the locations for all audio cuts and live copy recording during production. These cuts may be on several different hard drives or even on a different computer connected to the LAN.
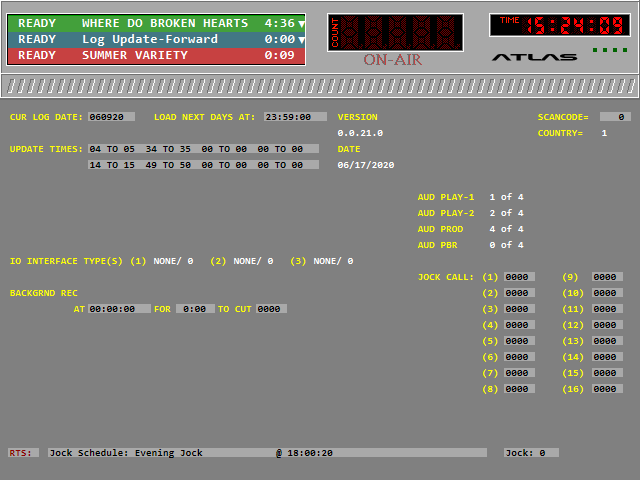
Control Panel
At the bottom left-hand side of the ATLAS screen is the control panel.
It contains several buttons that add a lot of power to the system. The panel buttons are activated by using a mouse. The button actions can also be duplicated by pressing the appropriate function or keyboard key. The panel also contains four card status lights, an intro timer and other informational cues.
Edit button

Pressing the edit button or pressing the (F9) key or the (E) key places the log into the edit mode and activates the audio cut, music and GOTO buttons. The air log screen will change into a dense display mode.
A black scrolling cursor bar will appear which may be moved rapidly up and down using the (up) and (down) arrow keys or the (pgup) and (pgdn) keys. Any event line may be modified in this mode. Until this button is pressed, the audio, music and GOTO buttons are inactive and become active only in this mode. If you wish, you may press (ALT+F9) and a blank edit log will appear in a new window. You must be aware that this is a blank log; to use it the operator must be familiar with the music database and cut index for proper selection of events to be entered on the log. There are several special features available when in the edit mode:
WARNING: ALL editing of the log currently running must be done utilizing the air log in the (F9) edit mode. Editing the current log through the production computer and then transferring the edited log over the LAN or by importing it from a disk or by using the control room log editor will result in severe problems with ATLAS.
While in the Edit screen, select an event immediately before the point in which you wish to force a new line. Then pressing the (ALT+I) keys in sequence to make a new line holding a 0011 cosmetic space. After the new line is created, then any cut index number, rotator, audio cut or music selection may be placed into this line in the normal fashion.
The insert function must rewrite the entire log to hard disk each time it is used. Therefore, using the insert function may be relatively slow and should be used only in emergencies. It is much better to plan and leave adequate spaces on the ATLAS log instead.
When in the edit mode, pressing the (Z) key will zoom up all available information on the audio cut or song title. The zoom dialog also displays any "memo" information on a song title that may be available in the music database.
Press (esc) to exit this dialog box.
Pressing (T) will make the edit screen track or line up with the air screen. Using the (esc) or right mouse button will return to the air mode.
Auditioning Audio Cuts
While in edit mode, you may:
- Audition a single audio cut.
- Audition the next scheduled audio cut within a rotator.
Simply move the black cursor bar to the audio cut or rotator you wish to audition and press (CTRL+A). This will cause any overlay to appear and then the audio cut will play. With rotators, as you move down the log to the same rotator again, only the audio cut you have selected as the next to play will be auditioned as ATLAS sees this as the next scheduled audio cut.
WARNING: This feature requires that a dedicated production audio device be set up in the EWC.INI file. It should not be used on the control room on-air system as audio overlap will occur during auditioning.
Previewing Copy
While in the edit mode, you may:
- Preview a single copy cut.
-
Preview the next schedule copy cut within a rotator.
Simply move the black cursor bar to the copy cut or rotator you wish to preview and press (CTRL+A). The copy will appear over the play panels in its entirety allowing you to preview the entire text of the copy. As with audio cuts in a rotator, ATLAS will only preview the next scheduled copy cut within a rotator.
Audio Cut Button:

For this option to function, the ATLAS system must have a suitable audio cut database loaded and you must be in edit mode. These cuts may be edited directly into the air log. To do this, use the (up) or (dn) arrow keys to move the black cursor line to the place on the air log you want to edit the audio cut into. Click on the button or press the (F10) key to get the select digital audio window to appear.
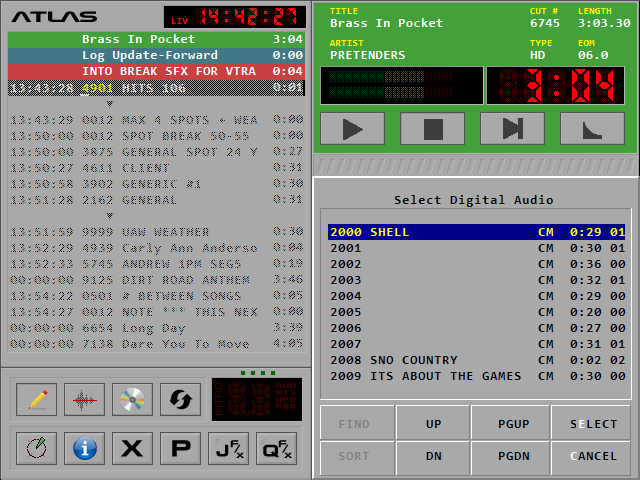
Then use the arrow keys, the mouse or the buttons at the bottom of the presented window to select the audio cut or rotator cut you wish to use. Then press (enter) or click the SELECT button to place the cut on the air log. The tilde (~) key above the (tab) toggles between the edit screen and the select digital audio window. Use (esc) or the right mouse button to exit.
INTRO Timer
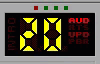
Systems that use Live Copy or systems that using music use this INTRO timer display to let the jock know how much time is remaining. It will use the intro time from the play panel and start a countdown. The inside right portion of the intro timer display also holds status information. This information is as follows:
- PBR (Programmed Background Record): Lights when the scheduled time for the PBR has been reached in the Real Time Scheduler.
- UPD (Update): Lights when an update is executed.
- CUE: N/A - Obsolete.
- RTS (Real Time Schedule): Lights when running events in RTS. Changes to blue when the last RTS event has been executed.
- AUD (Audio): Indicates that digital audio is playing.
Card Status Lights

Immediately above the intro timer is a series of four lights. These lights will illuminate to indicate the status of the system audio devices. ATLAS can handle four audio devices. The device status is indicated by the color of the lights. A gray color indicates that no device is installed in that position. A green light indicates that a device is installed but is currently inactive. A red light indicates that the device is in the playback mode. A yellow light indicates that the device is in the record mode.
LIVE/SWEEP Button

This button or the (S) key will toggle the system between the Live mode where everything is under the control of the jock or operator and the Sweep mode which disables live Copy, Tags, and other events that could keep the system from moving event-to-event without interruption.
The Sweep mode is most useful in systems that have music sources. Sweep means just what it sounds like. Events from the log are played in sequence without stopping unless the jock physically takes over. In the Sweep mode, all live Copy and Tags and other formatting codes are ignored. Sweep mode can be locked out permanently if desired when setting up the ATLAS system. While in the Sweep mode, the blue colored abbreviation SWP will illuminate within the system time box at the top of the log panel.
For stations that have Satellite capability using (CTRL+F4) will toggle ATLAS between the Live and SAT modes. The abbreviation LIVE or SAT will appear in red inside the system time box.
NOTE: ATLAS may be placed into Live, Sweep or Satellite mode by special cut numbers placed on the log. Cut 0013 is the Sweep mode. Cut 0014 is the Satellite mode and Cut 0015 is the Live mode. These commands can modify the effect of the Live/Sweep button if it is used.
Live Mode:

While in this mode, the abbreviation LIV will appear in the time box above the log. The numbers in the count-down timers on the play panels are displayed as an intense red. When the timer reaches 10 seconds or less the color changes to yellow. Each event can be under direct jock or operator control. Events will sequence until a cosmetic space (cut index number 0011) is reached. This cosmetic space is indicated by a small red cube (0011) in an event line. Special cosmetic spaces that are used only for formatting purposes are displayed as a green downward triangle (0030). These green spaces do not stop event sequencing. If the mode is changed from Sweep to Live while an event is airing, then that event will be forced into the Stop After mode and all sequencing will stop at the end of play.
- Live Tags: Tags will display as soon as the spot with the audio cut begins. Pressing (F5) to start the next event. Press (esc) to clear the Tag.
- Live Copy: In the Live mode, each piece of live copy will preview on the red and blue play panels before it is "aired". Short pieces of copy will be scaled to fit into the top play panel, while longer pieces will take up all three panels. The intro timer counts down the specified length to help with pacing. However, the timer has absolutely no effect on the start of the next event in sequence. To leave the copy after you are done, press (F5) to advance.
Sweep Mode

While in this mode, the abbreviation SWP will appear int he time box above the log. The numbers in the countdown timer display will be a bright blue until the timer reaches 10 seconds or less and then the color changes to yellow. Copy and Tags are ignored. In the stand-alone cart machine mode, the sweep operation will continue from event to event in sequence. Cosmetic spaces and cluster markers are ignored.
Satellite Mode

When in this mode, the abbreviation SAT will appear in the time box above the log. The event timer numbers are blue, and the log display shows the red cube indicating a cosmetic space (cut number 0011). In this mode, the system will sequence until it hits a cosmetic space. Then it will switch away to satellite or any other programming source that is available to a designated source channel on the audio switcher. In this mode, the cosmetic space cut number 0030 is ignored.
INFO Button

Pressing this button or the (I) key will bring up the ATLAS Information screen. This is a system diagnostic screen that assists the ATLAS support staff when they are called upon for help. This is a read only screen.
While in this screen, the ATLAS system log continues to operate in the background. It covers that main control screen and uses the top portion to give the operator the system time, time status (countdown) on the event currently running, and the events in the play panels that are running.
Obviously, the system should be running in the SWEEP mode when the info screen is in use, or the system should be halted. Otherwise the system may stop because of lack of program material.
XTERNAL Button

Pressing this button or the (X) key will pop up a control window for use with ATLAS systems that have the AS-28 or DMX-4 stereo audio switchers or a logic gate that may be adapted by the user for custom applications.
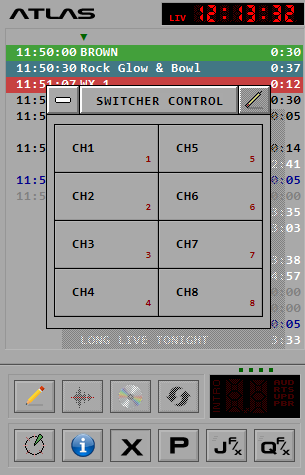
With systems that have the AS-28 switcher installed, a switcher control window will appear with eight buttons. Each button represents a separate channel for the switcher. The buttons can be personalized to the function that it serves through the Audio Control section of the EWC.INI file. The channel is activated by pressing the assigned button number (1-8) or using the mouse.
Production Button

Pressing this button, (P) or (ALT+F10) while in the main screen will bring up the Production Overlay window. This is the screen that you will use to edit, create and maintain your audio cuts. To exit the window, press (esc) or click the right mouse button.
ATLAS control room systems that have an independent record/play device installed may create and playback audio cuts in the foreground while the log events are playing in the background by using the Production screen.
The audio record/play device used for Production should be provided with its own audio input from the console or other source and the output of the record device should be attached to a monitor amplifier with its own speakers and/or headphones or a separate board channel with a cue capability.
TECHNICAL NOTE: The Production window may be used to maintain the cut index if a dedicated record/play device is not installed in the control room system. It is not possible to record or playback any audio cuts, but the maintenance capability can be very useful.
WARNING: It is assumed that the ATLAS system is in the sweep mode or that it has been stopped programming is originating from other audio sources the Production screen displayed. Only limited control of the background log events is available from the Production window if the system operator tries to use Live simultaneous operation.
At the top of the Production Overlay window is a monitor panel that displays the three current events to play, a count-down timer for the current event, the real system time, and four device status lights.

There are three special key combinations for controlling background log events:
- (SHIFT+F5): Start the next legal background log event.
- (SHIFT+F6): Stop any log event running in the background.
- (CTRL+SHIFT): For stations with multiple audio devices, these keys used in combination with the (F1), (F2), (F3), and (F4) keys will stop the audio playback on devices 1, 2, 3, and 4.
Limitations:
Because ATLAS is running many procedures simultaneously, there are some limitations to this kind of operation as compared to a simple stand-alone Production room system.
If the independent Production record/play devices is also used for PBR (Programmed Background Record), then any foreground record will be aborted if the PBR event starts. One solution is to install an additional independent PBR audio device to separate the functions. An ATLAS system can handle any combination of record/play or play only devices up to four audio devices maximum.
Unless the system is stopped, it is not possible to create audio cuts and then transfer them to another Production or Control room over the LAN.
No other overlay screen like the Jock F/X, Quick F/X, RTS, log editor, load logs or other similar screen may be displayed while the Production window is being used, although external button boxes will continue to operate without a problem.
Jock F/X Button

Pressing this button, the (F2) or (J) key will cause the Jock F/X page screen to appear as an overlay on the main ATLAS screen. There are 99 Jock F/X pages available, each with 28 buttons on each page. Each operator or jock can create and use their own library or tool kit of liners, jingles, ID's, sound effects, rotations, macros, closures, or audio cuts. This tool kit is developed using the Jock F/X button. Jock F/X will do just about whatever your imagination can create. It is a tool that a good live operator or jock can use to make themselves sound better than they ever have. And, it has uses far beyond the control room. Even when it is on the display screen as a foreground operation, the main ATLAS system remains at the ready or in operation in the background.
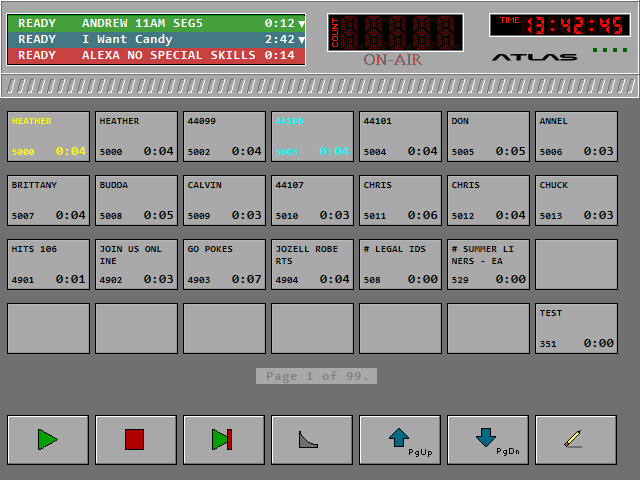
Pages may be flipped rapidly using the (pgup) and (pgdn) buttons at the bottom of the screen to reach a new location, or by pressing the (space) and entering the page number you wish to jump to. Once a page is selected, it is automatically displayed each time the Jock F/X button is pressed. This page will remain active even if the Jock screen is not up. This allows the use of pre-programmed keys, button boxes, or external logic controls to play any cut at any time. Jock F/X may also be operated by touch screen if desired.
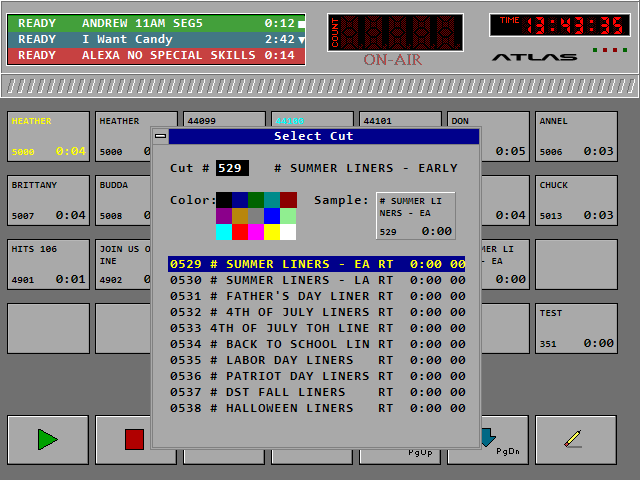
Select the Cut number: In the select cut window, type in the cut number (if known). If not known, use the (up) or (dn) arrow keys or the (pgup) or (pgdn) keys to scroll through the cut index display to find a valid macro, rotator or audio cut number. Live copy numbers are not allowed. Any audio cuts including features of any length and music on hard disk are legal. (pic)
- Select a Button Color (optional): If you want the Jock F/X button to be a special color (example: red for commercials), then use the (+) or (-) keys on the number key pad to move to the color you want or click on the appropriate color in the color selection region using the mouse.
- Inserting the Cut into the Button: Press (enter) to insert the cut number into the screen button. Edit any other buttons while the screen is displayed.
- Deleting a Button: If a button is no longer needed or if you just need to reuse it, you can delete the association by entering all zeroes (0000) in the cut # section of the select cut window.
- Exiting the Select Cut Window: Press (esc) to get out of the select cut window and use (esc) again or press the right mouse button to leave the Jock F/X screen.
Alternate Jock F/X Activation: The Jock F/X buttons are designed for live operation. It wouldn't make much sense to use it during a sweep session. However, it is available, but only if you have two audio devices with playback capability. We assume, however, that the ATLAS system is in the Live mode. There are several ways to start the Jock F/X buttons even when the screen is not visible.
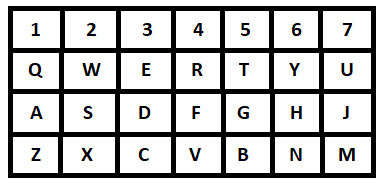
The Keyboard
The following keys are mapped into a 4 by 7 matrix that simulates the Jock F/X screen layout when the (scrlk) key is toggled on. For instance: If the (scrlk) key is on and you press the 1 key, the audio cut in the top Jock F/X button on the left will play.
-
Button Box: We strongly suggest that a button box set up in a 4 by 7 matrix be used by all customers that will depend upon the Jock F/X for much of their operation. A button box adds a lot to the speed and flexibility of the system. There are number of different kinds of button boxes that are available and there are also provisions to supply logic closures for users that want to construct their own boxes.
-
Touch Screen: Users that want to keep the Jock F/X up continuously may want to consider the uses of a touch screen.
-
External Switches: Jock F/X buttons can be mapped to external button boxes using IOMAP. Ask ATLAS support about this feature before entering the IOMAP.
-
Jock F/X Audio: Jock F/X uses the regular audio devices from the main ATLAS system. It can be set to use a dedicated audio device of its own, or any dedicated record/play device that may be installed in the system for Production or PBR. So, the number of standard playback sources in the system determines the overall audio availability of the Jock F/X.
-
Audio with one playback device:
- If the main ATLAS system is playing digital audio in the background and the Jock F/X button is pressed in the foreground, the button will not play.
- If the Jock F/X button is running and the main start for the background ATLAS system is pressed, ATLAS log play will not start.
- If a Jock F/X button is running and another button is pressed, the second will not play. The buttons are NOT "buffered" to start after the completion of the other.
-
Audio with multiple playback devices:
- If there is an audio device available, any source that starts will grab it. If no audio device is available, the source will not play. A maximum of four audio devices may be installed in any system.
-
Timing Jock F/X Audio Cuts:
- There is no countdown or count-up timer available on the Jock F/X page screen. There are several reasons for this. First, the Jock F/X will be used without being displayed during a large part of the time. Second, with multiple audio devices available, and with the possibility of very fast overlaps and intercuts between audio cuts, a single timer would be useless. The only real disadvantage to the lack of a timer is to the user that puts a very long feature or program length audio cut into a Jock F/X button for convenience of play.
-
Other Jock F/X Applications: There are several additional ways to use the Jock F/X feature creatively. Here are just a few ideas:
- Special Events: Set up one or more Jock F/X pages with all the spots and features that would be used during a special event like a ball game or remote. Then have the live operator punch off these events on cue.
- Request Jock F/X page(s): Create requested music on hard disk and edit the selections into one or more pages.
- Non-broadcast use: In a stadium or auditorium, set up Jock F/X pages by inning, by scene, by selection or in any group or sequence that is convenient.
The top part of the Jock F/X page screen has a monitor for the ATLAS background operation this is the same as the monitor on the Overlay Production screen. Even through the Jock F/X page is displayed, the operator still has control of the main log operation with the key combinations below:
- (F5): Start the next legal background log event.
- (F6): Stop any log event running in the background.
- (ALT+F6): May be used to stop all Jock F/X play.
- (CTRL+SHIFT): For stations with multiple audio devices, these keys used in combination with the (F1), (F2), (F3), and (F4) keys will stop the audio playback on devices 1, 2, 3, and 4.
The bottom of the Jock F/X screen contains the control buttons for the background ATLAS operation as well as a few buttons for use with the Jock F/X. The Play, Stop, and Stop After buttons have the same function here as they do on the play panels. The Page Up and Page Down buttons are used to move through the Jock F/X pages and the Edit key is used to activate the edit function for the Jock F/X buttons.
The Jock F/X pages cannot be displayed over the top of the Production window or any of the other windows/screens that make up the ATLAS Control room. When a MACRO is running, Jock F/X may not be operated over the top of the main ATLAS screen, and all touch screen and mouse functions are disabled. However, if the Jock F/X button is operated by an external button box or the keyboard, then any key or button that is mapped to the Jock F/X button will operate at any time.
Quick F/X Button

Pressing this button, the (Q) or (F3) keys will bring up the Quick F/X window.
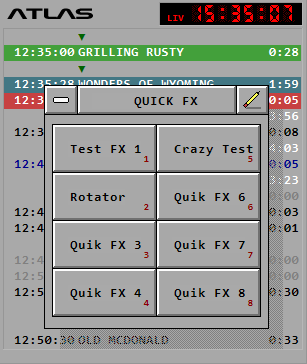
This is a multi-purpose instant access feature that adds great power to ATLAS. Each of the eight Quick F/X buttons hold up to 10 audio cuts that may be played in sequence or under formatted control. When used with an optional external button box, each of the eight buttons may be played instantly without pressing any keyboard combinations. (pic)
Creating a Quick F/X Play list: Creating one or more Quick F/X play lists is very easy. There are just a few easy steps: (pic)
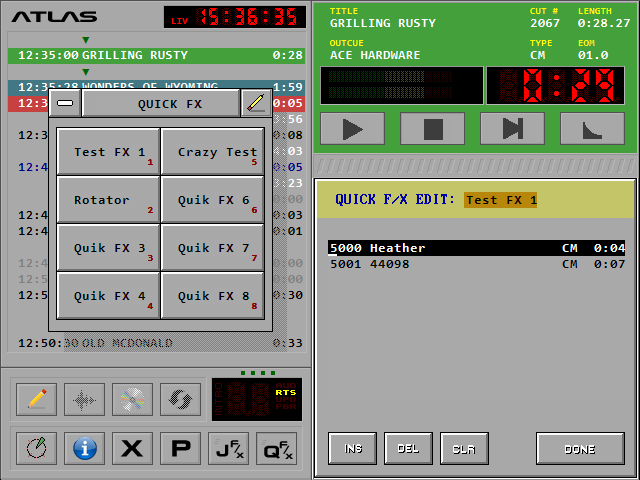
- Press (F3) or (Q) to display the Quick F/X buttons on the screen.
- Click on the Edit icon at the top right of the box or press (F9) to enter the edit mode.
- Select Button: Use the arrow keys to highlight one of the eight buttons available and press (enter). A Quick Edit box covering the middle and bottom play panels will open on the lower right side of the screen. The cursor will be on the first entry line.
- Entry: Type in a valid cut or rotator number and the cut description, type and length will be displayed. Press the down arrow to go to the next event in the play list. Up to ten event lines may be entered. Copy and Macros are not allowed.
- Title: Create a title for the Quick F/X by pressing the (up) arrow until it reaches the colored title box at the top of the panel. An entry field will appear. The name you type in will appear on the Quick F/X button itself when it displays. (pic)
- Exit: Press (esc) to get out of the Quick Edit mode and use (esc) again or press the right mouse button to leave the Quick F/X window.
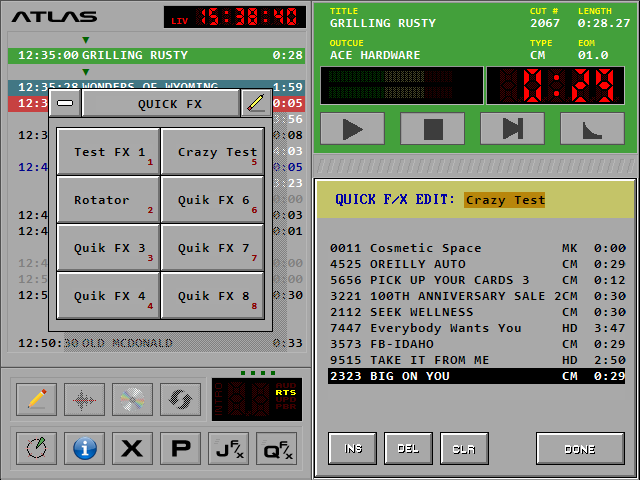
Editing: Editing a Quick F/X button play list is just as easy as creating one. Just follow these steps:
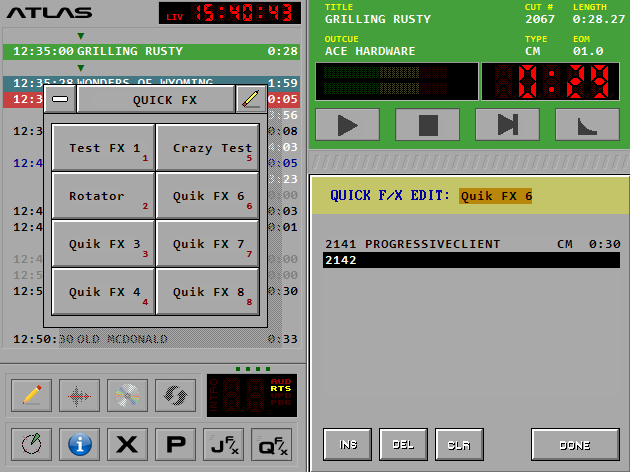
- Press (F3) or (Q) to display the Quick F/X buttons on the screen. (pic)
- Click on the Edit icon at the top right of the box or press (F9) to enter the edit mode.
- Select Button: Use the arrow keys to highlight one of the eight buttons available and press (enter). A Quick Edit box covering the middle and bottom play panels will open on the lower right side of the screen. The cursor will be on the first entry line.
- Edit the Play list: Use the buttons at the bottom of the Edit box to Insert (ins) or Delete (del) an event or use the Clear (clr) button to erase the entire play list and start from scratch.
- Exit: Press (esc) to get out of the Quick Edit mode and use (esc) again or press the right mouse button to leave the Quick F/X window.
Playback: When the Quick F/X window is visible, any of the quick buttons may be started by pressing the keyboard numbers (1) through (8) or by clicking on the button itself.
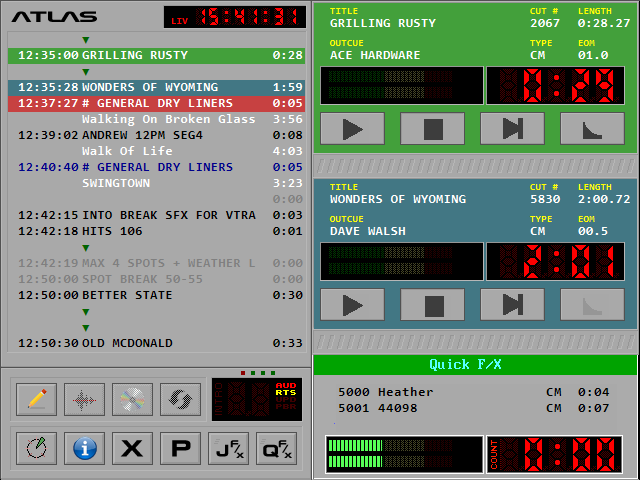
When a Quick F/X event list is playing, it is displayed at the lower right of the screen where the READY play panel is normally placed. From the keyboard, pressing the key combinations (Q) + (1) through (Q) + (8) will start whatever is in the Quick Key for that number. If there is more than one event in the box, it will be played.
WARNING: To avoid conflict with the Jock F/X, the (scrlk) key should be toggled OFF.
Live Copy Text
When the system is in the Live mode, ATLAS can schedule and display live copy text that has been created in Production for the jock on the screen.
Not only is the live copy displayed, it is previewed as it moves up through the play panels. The jock has plenty of time to prep for phrasing and length.

The copy appears first on the bottom READY panel and will move up as the event progresses to the top panel. Regardless of the length of the copy file, the copy display is scaled to take up only the space occupied by the panel it is currently in. When it progresses to the top panel it will cover all three panels regardless of the actual length of the copy.

When the copy reaches the top play panel, a countdown timer running in the intro box lets the jock place the copy to time. Press (F5) or (enter) to start the next event and (esc) or press the right mouse button to clear the copy screen.

Copy may be scheduled on the current ATLAS log in the same way that audio cuts or music are placed. The type "CP". A cut with this type can also have an audio file. If ATLAS is in the LIVE mode, the audio will play, and the copy will be displayed. If ATLAS is in the SAT or SWEEP mode and the cut is schedule, only the audio will play.
Live Tags
In addition, for digital audio cuts that require live TAGS, the ATLAS screen will display the tag for the jock to air at the end of the spot. Again, the jock has control of the switch away to the next event. Tags are also created in Production.

Press (F5) or (enter) to continue the sequence after the Tag has been "aired". Then press (esc) to clear the tag from the play log.
The Audit Log
The ATLAS system writes its audit log to a file as it goes. The audit log is dated and saved indefinitely. It can be displayed or printed on the Production room system in the log editor. The Audit Log tries to provide a record of events that are missed when the system reboots after a power failure or when a long update is done. However, careful manual checking should be done to verify this record.
Main Screen Audit Log

If you are in the ATLAS main screen and want to see the audit log, simply press (CTRL+A) keys to view the log for digital audio events or (CTRL+S) to display the songs. This will bring up the most current twenty events on the log that is currently running. To view any prior remaining events on the audit log, press the (pgup)/(pgdn)/(up)/(dn) keys. A small window in the upper right hand corner of the screen will display the log event number range that you are currently viewing. On systems using music, a separate music audit log file is created in order to keep the size of the main audit log to manageable proportions. To discover what action was taken for a event check the Seg column for the following codes:
The Log Editor Audit Log

An audit log may also be displayed and/or printed when viewed using the Log Editor. This is available on ATLAS systems with a separate Production room computer.
Select the Log Editor.
Then press (F4) (Load) and select audit from the drop-down menu. Select the audit log you wish to view and click OK. The log displayed will contain the digital audio events for the log selected.
You may print this log by pressing (F2) (verify) and selecting one of the print log options or by pressing (CTRL+F7) (print log) or (CTRL+F8) (print marked log) and the log will print.