Project "AXS"
About
THIS PRODUCT IS CURRENTLY IN "ALPHA".
Table of Contents
-
Foreword
- General Information
- Setting Up The System
- Software Support Policy
- Sensible Precautions
-
Chapter 1 - The AXS System
- Overview
- AXS Setup Guide
- AXS "Hot Keys"
-
Chapter 2 - AXS Main Screen
- Overview
- The Digital Audio Display
- Event Timer
- Panel Buttons
- The Air Log Panel
- Loading an AXS Daily Log
- General Log Editing
- The Control Panel
- Live Copy Text
- Live Tags
- The Audit Log
-
Chapter 3 - AXS Production Screen
- Overview
- Production Screen
- Overlay Production Screen
- Selecting an Audio Cut
- The Cut Index Header
- Recording an Audio Cut
- Playing an Audio Cut
- Cut Index Utility Keys
- Cut Rotation Tables
- Creating Macros
- Live Copy Text
- Live Tags
- Production Cut Index and Text Maintenance Feature
- AXS Cut Index Reservation Guide
- Reserved Cut Types
- Chapter 4 - Extended Features
- Chapter 5 - Optional Features
- Appendix 1 - Sample AXS Files
- Appendix 2 - Master Log Setup
- Appendix 3 - AXS Satellite Programming
- Appendix 4 - AXS System Maintenance
- Appendix 5 - Using a LAN
- Appendix 6 - Using Multiple Switchers
- Appendix 7 - Using Intro/Outro Link Codes
- Appendix 8 - Power-Fill Programming Aid
Forward
General Information
This document is meant to help you operate your AXS system with a minimum number of problems and a minimum expenditure of time. Although we don't expect you to have a Computer Science degree, it is our expectation that the people who install and operate the system to have a reasonable knowledge of computer operations, engineering practices, and the way your station operates.
We realize you are anxious to get the AXS system up and running. But after years of experience with our products in all kinds of stations, we ask that you follow our instructions and take your time. There is a plan behind it all.
Shiny Stone Digital is NOT responsible for any errors, omissions or typos in this document. This document does not define the performance or specifications or contents of the software. We reserve the right to add to, delete or change products without notice.
Setting Up the System
Shiny Stone Digital has assisted stations in setting up their systems since 1991. Over 95% of our stations have been set up without having our support people come to the station. The system works!
However, in that time period we have found several ways that stations manage to cause themselves unnecessary problems and frustrations during set up. We want to make it as EASY as possible for you. Here are some guidelines:
DON'T SET UNREALISTIC DEADLINES: It takes TIME to set up a system, whether you have someone come in to help or not. There is a LOT of work, both clerical and decision making in setting up a system. Don't get in a hurry.
READ THIS DOCUMENT: The information is here. If it is NOT, then we will correct the problem as soon as possible. If you don't understand what you are reading, ask someone else in the station. If they don't know, then call and ask us. In a large, powerful computer program like this, we cannot possibly have an example for every situation or a copy of every computer screen. Do NOT expect to have EVERYTHING spelled out for you. That's what our support people are for if you get stuck.
THE TRADE OFF: We make it clear in our advertising, our sales conversations, and our approach that you are trading the services of a support person in your station to do the installation for the much lower cost of doing it yourself. The ONLY way this will work is if you call whenever you need to in the beginning. Contacting us is cheap compared to the cost of a person in your station for several days.
THE BEST WAY to set up your system: The ideal persons to do this are the station engineer and the people who will use it the most.
THE SECOND BEST WAY to set up your system: If you really feel after getting started that you need someone to help you in the station, then we will be glad to schedule someone to come in for expenses plus a very reasonable per-diem. The average stat in the station is only about two or three days. OR, it is quite possible that we may be able to find someone in your geographic area that has set up our systems in the past. If we feel they are competent then you might be able to have them come in to help you on a private contract.
THE WORST WAY to set up your system:
- To hire or use someone on your staff that "knows" computers, but doesn't know broadcasting and/or engineering good practice rules. This is exactly what you don't need. What you really need is someone that knows about the operation of your station and how computer / peripherals need to be installed.
- To hire a "consultant" that has no knowledge of broadcast operation to do it. The general reason you might tend to hire someone like this is that they will assure you that they can "save you time", eliminate "computer problems", and then after they get the system operating they will teach your people to use it on a daily basis. Most of these people know little or nothing about the specialized requirements of broadcast stations. Even if this person is knowledgeable in broadcasting, it creates extra expense and still requires that your station people must take the time to learn the system at some point anyway.
- Let the "computer store" do it: This is not what they are in the business to do. While they may be knowledgeable in software, they know nothing about this kind of specialized software. And, if they are any good at all, they will expect you to pay for their services. Again, this is not necessary and is a duplicate of time and money.
CONTACT US IF YOU HAVE A PROBLEM. We can't read your mind. If you have a problem, then you must contact us. Don't waste time trying to figure it out. We can probably have the problem explained long before your people get frustrated and mad. Remember, if you are resistant to your contacting use when you are setting the system up, then you are letting yourself in for real trouble. Our support people are paid to help you. The only dumb question is the one you failed to ask that caused your station to go off the air and lose money. When you do call, please follow the instructions of the support technician. Failure to follow instructions or second guessing the technician will only complicate matters.
We try to supply sufficient people, equipment and phones so that you have a reasonable chance of getting through to us in most cases. There are some cases where we will call you, but they are very limited.
Our support people are human. They do make mistakes. In fact, they are just about that perfect as the stations and people they support. If you don't get an update or a fix that has been promised, then contact our customer service director. If someone says they'll get back and then doesn't, then contact our customer service director. Don't just sit there getting mad. Support is a two way street. If you don't want to call, then send us a FAX at our FAX number (817-???-????).
JUST THE FACTS: Support cannot help you if they can't figure out what, where and how you are having problems. It is not enough to say that you have a problem. Write down everything that is happening before you call. It will save everyone's time. We don't expect you to know technically what is wrong. Just where and what seems to be the problem to you and the logical sequence that it occurred.
TRUST YOUR PEOPLE: If you have a problem, we want to talk to the person operating the system. It is really very tough for our support people to try to work through second or third parties. In fact, support is authorized to refuse to try to help in situations like this, if it becomes to difficult. Our support people are not impressed with "authority figures" that call and try to explain problems "second hand". We want to speak with the person(s) using the system. How can your people learn if you don't let them?
TRUST US: We've been around since 1991. We have hundreds of systems just like yours in the field. We wouldn't have been around this long unless we are doing something right. You will make a mistake if you accept the advice of a local "computer person" instead of ours where it comes to our product. Follow the instructions of the support technician and things will go much faster and smoother.
LEARNING TAKES TIME: The first few weeks of setting up any system from any supplier is time consuming. No matter whether you have on-site help or not. There is just some learning, some decisions to make and a lot of clerical type work to do. There is no way to avoid it. The best way to handle it is to plan ahead, read this document and contact us with questions.
THIS !@#$#&*%! SYSTEM DOESN'T WORK! This is a very convenient "crutch" for anyone that won't read this documentation or contact us or that really doesn't want to spend the time to set the system up correctly. You're just deluding yourself. If you're having problems, then write down everything that you think is going wrong. Then contact our support technicians. Don't have the manager make the call. It should be the person installing the system. Take your time. Explain everything. And, listen carefully to the explanations and suggestions from the support technicians. Write them down.
WHERE'S MY UPDATE: Occasionally someone finds a bug that needs to a "fix". If support says that they will send out an update as soon as they can, that doesn't always mean the next day or even a few days. Sometimes other pressing things intervene or the fix takes a long time to figure out. We don't mind your contacting us to see about the progress, but please exercise some patients with us.
THE GOLDEN RULE WORKS: Nobody likes to have a problem. And it is even more irritating to have a problem that doesn't offer a solution rapidly. But you won't gain anything by being irritable, abusive or offensive to our support people. In fact, they are authorized to terminate calls where you or your people are not co-operating or are abusive.
WE KNOW WHO YOU ARE: Every support interacting that comes in is logged; there is a complete support file on your station. We look at all of them periodically.
WE NEED YOUR HELP: If you are asked to try something on your system when you have a problem and then contact us back with the results, then please do it. Or, if you are asked to send a back up of your station data files so that we can recreate the problem on our systems, then do it. Sometimes this is the only way. If you don't, then how can we help?
Software Support Policy
It is the intent of Shiny Stone Digital to support all of the computer software that it provides as fully as possible. The following statements detail the current software support policy. Shiny Stone Digital may change this policy from time to time without prior notice. A copy of the current software support policy statement is available upon request:
- Software Support: Shiny Stone Digital offers support on its current AXS software to qualified customers. The standard form of support is by customer paid telephone. The staff will offer advice, error correction and consultation during published business hours. In some cases it may be possible to obtain special support outside business hours by prior arrangement. On-site installation and software support and training at additional cost may be provided under separate contract depending on staff availability. Fees for this service will include all expenses and a per-diem fee PAID IN ADVANCE.
- No Pay - No Support: If you haven't paid your support fee, or if you are behind on your other accounts with us, the support people may not be allowed to give you help. If you have any questions in this area it is best to ask for the customer service director and talk about the situation. The customer service department is not authorized to answer support questions or offer support.
- Support Staff: Shiny Stone Digital will try to have support people available during the current published working hours. If it is not possible to have staff on hand, then voice mail or answering service will be available to take calls.
- Telephone Policy: Support services is provided through telephone contact from the customer. Shiny Stone Digital will attempt to provide a reasonable number of telephone lines for this contact within a reasonable period of time. However, the customer should not expect that there will be a free telephone line or support staff available at all times. The customer is expected to keep attempting to complete the support call until it goes through. Shiny Stone Digital assumes no responsibility for telephone interruption due to trunk line or circuit overloading, power failure or other acts not directly under its control.
- Update Policy: Shiny Stone Digital does not provide free custom alterations on its general computer programs. It intends that all customers with the same level of software will always have the same software. From time to time, it may offer general updates or improvements to the current program to its customers that qualify for support.
- Current Version: Shiny Stone Digital will only support the current software version level. All version updates must be installed within a reasonable time. Support for systems that are not using the current software version level will be on a low priority basis. We reserve the right to terminate support for non-current software at any time, without notice. While Shiny Stone Digital will make every effort to make software compatible with previous versions of the program, there can be no guarantee that new versions can be added without re-entering all or part of your existing data. Shiny Stone Digital is under no obligation to offer "data conversion" programs, and if it does so, does not guarantee that these programs will transfer all data correctly and completely.
- Bug Fixes: No computer program is ever completely free of operational errors, Shiny Stone Digital will make the sole decision as to whether the problem is an operational error or "bug" in the standard program, a computer operator error, a problem inherent to the limitations of the computer used or a computer hardware problem. Shiny Stone Digital will attempt to identify and remedy all known operational errors in the standard program within a reasonable time.
In lieu of a direct remedy, Shiny Stone Digital reserves the right to offer a substitute program as part of a general update. If the customer does not accept the update offered then no other attempt will be made to fix the operational error in the existing program.
- Shipment Policy: All shipments of software "fixes", updates and new programs will be provided / delivered via the internet. Shipment costs for hardware items being returned for warranty repair or replacement will be at customer expense both ways.
- Software Support Period: The sales agreement specifies the FREE support period offered after purchase of the AXS system. After the free support period is over, technical support may be continued only by payment of an monthly support fee. These fees are published at the rates may vary as to the payment period.
- Support Participation: Support services from Shiny Stone Digital are directed to those persons that use, operate and/or maintain the systems. The most efficient use of support will not be found when dealing with station management or ownership or other staff members that do not deal with the system on a daily basis.
- Other Software: Shiny Stone Digital may offer for sale computer software that it does not produce (3rd Party). Support for these software products will be through the original vendor of that software and not Shiny Stone Digital.
- Hardware Support: Shiny Stone Digital may offer for sale computer hardware. Support for this hardware will be from the designated service depot in your area as specified by the manufacturer or distributor of the hardware according to the included warranty agreement(s). Unless advised in writing, Shiny Stone Digital provides no service on computer hardware.
Sensible Precautions
- POWER LINE fluctuations: If you have a dirty power line or one that fluctuates more than the allowable maximums then you may find you will have computer trouble. All good computers are made to stand normal fluctuations and damp the normal spikes from power lines. Check with your engineer and get the power company to clean it up. If this is not possible, it may be necessary to use one of several "power conditioner" components between the computer and the power source.
- IN-STATION POWER problems: Ideally the computer should be on a standard circuit with NO other devices that draw can put on spikes, hash or overload the line. You are asking for trouble if you don't watch this.
- CLEANLINESS: If you care about your station, then think about keeping the area around the computer free from smoke, soft drinks, food, tools, casual customer handling and children... and rats... don't forget to watch out for the rats trying to find a nest.
- RF Interference: Doesn't seem to be much of a problem; however, use good engineering practice with the computer. After all, it is a solid state device like your other equipment. Watch your station grounding practices.
- Static: Other than power line, the biggest single problem is static electricity. Static charges from careless handling and thoughtless computer placement can be disastrous. Almost all of these problems can be avoided by thinking ahead. We will be glad to advise you on this if you wish.
Uninterruptable Power Supply (UPS) systems (highly recommended): Many stations are now guaranteeing that they will not have the problems caused by either microsecond or long term power failure by installing a UPS. We highly recommend that a UPS be connected to every device on a network. A UPS provides enough battery storage time for you to shut down all attached devices without losing data.
Error Codes: You are likely to get some error code on the screen occasionally. The system will "pop" a box on the screen that has the error code, an error description and ways to get out of the situation. You should always write down the error code and description. Then when you contact us for assistance, we can help immediately. There are several things that can cause these codes:
- Bad Data: Information was entered or omitted that causes the computer to become confused. The program is extremely well protected on error entry, but it can still happen. Check yourself for accuracy and don't go too fast.
- Machine Error: Occasionally, for no apparent reason, your computer or associated parts will just glitch. It may be caused by a power spike that just hits instantly and leaves.
- Machine Failure: They do. They will. And sometimes it will be hard to tell if its the machine, an outside influence or the program itself. Try to pick up a pattern and talk to someone about it.
- Program Error: We do. We will. Someone will always try something in a way we couldn't foresee and a bug will pop up. If it is recurring, call us quick. IF we can't get you around it we will find a fix and provide an update posthaste. The only solution to "human error" of this type is to avoid improving the programs... and we're not going to do that.
- Error Diagnosis: The pattern is everything! We urge you to write down as complete a description of the error that occurs as you can. Neither we or your service center can read your mind. It will make things go much faster.
Summary: Don't hesitate to contact us! We would much rather to talk to the person that is operating the machine than a second-party. We promise that we will not talk dirty or talk computerese to people with problems. Most of the time, simple questions can produce answers to error codes and other problems. Customer calling for support must do so on our 817-631-3266 number or they will be asked to call back.
What-Ifs: We are always open to possible improvements, wrinkles that will make the program run faster, or give better information or be easier to use. Please remember that this program is provided for GENERAL use by a large number of stations and that we may not be able to use an idea that would be great for you alone but might be a disaster for others. But don't hesitate to bring them up. We can't say yes to everything, but we aren't able to ever say yes if you don't ask. We are always interested.
Station Start-Ups: It would help if you would contact us in advance and let the support people know that you are getting ready for initial startup. We might have some suggestions as to the best days, times, etc.
Customer Service Director: If at any time you feel that your needs are not being met or that you have a complaint, please contact our customer service director. Our support people are not equipped nor are they allowed to handle non-support related issues.
Chapter 1 - The AXS System
Overview: AXS is a premium level digital automation controller that can be used in both live broadcasting and as a limited live assist partner. AXS combines digital recording to hard disk with a log event sequencer that replaces the paper broadcast log. Like regular audio cart operations, the production room equipment is used to record audio cuts of all kinds. AXS is capable of running in any of several modes and may switch between them on command.
Start Screen
When not in operation mode (main screen), the start screen...
(TODO)
Main Screen
This is the screen you will use to run and monitor your station. If you are a single computer (control tool only) system, leave this screen only when absolutely required as doing so will (most likely) "take you off the air".
Production Screen
The Production screen is used to create, edit and maintain your audio cuts and the "cut index".
Log Editor
This is the screen you will use to create and maintain your logs. While editing may also be accomplished from the Main Screen, it is better to edit your logs ahead of time using the log editor.
Time Record (Optional)
You will use this screen to record the audio cuts that will be used for the optional time announce feature.
Real-Time Scheduler (Optional)
This screen is used to control the Real Time operations of the AXS system. It allows you to establish a specific time for an event to take place within AXS.
IOMAP (Optional)
View and modify the "virtual patch panel" (configurable input/output) used in AXS.
The EWC.INI
Proper setup of this file is crucial to the smooth operation of your AXS system. Editing this file should not be done unless absolutely required and only under the supervision of someone on AXS support. The potential for serious system lockup or failure is high if errors are made in editing this file. Make your entries very carefully, as the wording and spelling must be exact. It is a good idea to make a backup copy of your EWC.INI file when you receive your system and immediately after any changes are made. A copy of a typicall AXS.INI file is included as part of APPENDIX 2 at the end of this documentation. It is not intended to reflect your file, it is strictly for familiarization.
Keyboard Controls
By using individual keys and key combinations on the keyboard, the jock or AXS operator may perform various operations. A full description of key combinations is included as a table at the end of this chapter.
Setup Guidance
The following is a simple set of guidelines and suggestions that will help make setting up your AXS system a little smoother. They are not intended to walk you through the entire setup procedure and should not be used as a final setup checklist. Please read this entire section in advance so that you have some idea of the sequence you must follow and so that you can do some preplanning. Be sure to read the material in the rest of this documentation as well. AXS has been designed for installation by the customer. However, it is a mistake to assume that this system can be installed by novices with no knowledge of broadcasting, broadcast programming, some basic computer literacy, or without a certain amount of competent technical help. In addition, the installation procedure and testing involves a good deal of data entry, audio recording and dubbing, some time for wiring, and time for testing before placing it on the air. Do not expect to setup AXS overnight or even over a weekend. Careful advance planning is necessary and enough time should be allowed to get the system on without pushing it to the last minute.
Traffic & Billing
If you are attempting to install a Traffic & Billing system at the same time, then allow a lot of extra time to get everything running. Traffic systems take far longer than Digital Audio Systems to install and if you are using a Traffic Interface to load AXS, then the system must be at least able to produce a log for the interface to use.
Music Scheduling
Long before AXS is to be used, all the work of loading hard disk music database into a computer music play list generator program should have been done. Each music selection should have had proper cart numbers assigned and sample play lists should have been generated. The log interface that combines the Traffic log and Music Log into an AXS log should have been tested to be sure that they log is exactly what you want in terms of a format and that can be aired by the AXS system.
There is a correct order in which AXS should be setup. Don't skip around. If your AXS system consists of several computers which are linked together over the local area network, then certain parts of the setup can be done simultaneously. However, we suggest that you avoid wasting time by following these steps exactly. Please contact AXS support at any time with any questions during setup. We will assist in every way possible short of setting the system up for you.
AXS Setup Guide
[ ] Read the Installation and Technical Manual thoroughly. It has specific information about how to wire your audio sources and other components to AXS. This technical documentation is provided separately from this reference documentation and is the guide to the technical portions of the systems which will be covered very generally in this reference documentation.
The Technical Manual is specific to your system. There are at least two optional audio mixer/switchers plus several other combinations of equipment that may make up an AXS system. If there are any questions, please contact AXS support.
Note: AXS is designed to be set up and operated by the customer. While some basic programming has bene provided with the AXS system for your convenience, it is not the function of our support staff or our company to totally program the system. It is the responsibility of the station management to provide enough competent people that will read the documentation, learn the system by example and to gain enough experience to operate the AXS system effectively on a day-to-day basis. Because there is so much variety in station formats and operating procedures, Shiny Stone Digital can only help those that are willing to help themselves.
[ ] About RF
All the broadcast engineering good practice requirements apply to AXS. There is no magic bullet to avoid RF or noise or control interruption on overly long cables. If you have RF near the installation, then use exercise good engineering practices during installation. If you don't know what "good practice" usage is, then consult a broadcast engineer.
We do not recommend the installation of any AXS components next to, or in the same rack with, a powerful transmitter. Audio cable runs should be shielded wire and good practice terminations. Control cable should be as short as possible and well terminated. Flat ribbon cable should be as short as possible and certainly not over about 6-10 feet long.
Remember that PC components emit RF and care should be take with placement around consoles and other devices with high gain inputs.
[ ] Computer System Assembly (Customer supplied computers)
Customers that have elected to supply their own hardware must be sure that these units have been properly set up and tested. It is recommended that care and consideration should be given to whether or not to keep the system "clean"; meaning no other software other than the operating system and AXS be installed on the machine.
[ ] Local Area Network (LAN)
If you are going to use the system in a network configuration, verify that your local area network configuration is working as intended (separate of testing with AXS).
[ ] Digital Audio Device(s)
The AXS system contains one or more digital audio devices.
[ ] AXS Software Installation
Install the AXS software on each computer. Each computer uses the same software set. To install the software, click here (requires Microsoft Edge or Microsoft Internet Explorer). The installation will create a number of directories under C:\AXS.
[ ] Designated Computers
The customer should determine which machines will be utilized for which purposes (Control, Production, etc.).
[ ] Audio Cabling
Test the level and phase of the audio cable from the outputs of the AXS Control and Production systems and the audio cable from the console to the recording inputs of the AXS Production system. If the sound is tinny or distorted, it is probably out of phase. Don't assume that all audio inputs and outputs of your audio chain are in phase. Test each one carefully. Check your audio ground plane for loops and avoid grounds of any kind.
[ ] Cable Installation
Audio cabling from the AXS outputs and to the AXS recording inputs is supplied by and installed by the customer. Specifications are included in the Installation and Technical Manual. Pay attention to phase, impedance and level. When setting up the recording output from your console or other source give careful attention to the output level requirements as detailed in the Technical Manual. Any digital audio system is critical about recording level. Over modulation cannot be tolerated. If the record level is not set correctly, then the system will sound bad.
[ ] Cabling the computer and other hardware
Using the Technical Manual and any necessary help from AXS support, be sure that any of the computer hardware that is supplied with AXS is setup and operating properly. If you have multiple AXS units that are interconnected through the LAN, test the operation. Using the sample audio cuts supplied with the AXS system, be sure that the connections to external program lines and/or consoles are correct. Test the incoming Record lines from the dubbing source or console for proper operation.
[ ] Audio Quality
The AXS system is shipped to you with a couple of audio cuts that have been recorded for test purposes. Please route the audio outputs into a reasonably good monitoring system and listen to the cuts at a normal level.
[ ] System Setup
If you purchased the complete system, then your AXS system has had a preliminary setup for defaults and for the use of correct "paths" between multiple AXS units (if used) according to the information that was supplied to Shiny Stone Digital. However, it would be a good idea to call AXS software support and have them review the setup before you get started.
If you are supplying the computer hardware, then you must check to be sure that everything is set up correctly according to the instructions.
[ ] Program Format
It is the responsibility of the user to enter and maintain its programming format. One or more persons should be able to handle major and day-to-day changes. This will require thorough reading of this documentation and hands on work with the AXS system. The AXS system that was shipped to your station has been set up to have a sample format installed on the Log and Cut Indexes. Major programming changes can be quite complex to visualize and very time consuming. Please allow adequate time for the changes. If you need help, it may be necessary that we have you provide your format information to us upon request.
The following steps will begin the actual process of entering all the audio, data and other information that will be required to get AXS on the air. This will be done on the AXS Production system and then transferred via LAN to the Control or On-Air system. Stand-alone Control systems must do their setup work on the integrated Production screen.
[ ] The Cut Index
Each audio cut in the AXS system must have an identifying "cut" number. In addition, specific cut numbers are used for control purposes and for identifying "rotations" of related audio cuts or spots. A "cut" number can be related in some ways to the "cart" number you may have used, expect that each audio cut is handled individually with its own Start and End as well as other characteristics. Each audio cut must have a "cut" number before it can become part of a Sub or Rotation table. A suggested "cut index" or audio cut number scheme is included in the end of the documentation and is in place on the AXS system when you receive it.
Important Note: It is absolutely necessary that each use follows the Cut Index numbering scheme that is listed elsewhere in this documentation and in the Installation Manual. We will not be able to provide effective AXS support to stations that will not follow the numbering scheme.
[ ] Dubbing Spots
Record or dub all your existing audio cuts into AXS using the Cut Index numbers. The AXS Production screen is the fastest way to do this. You will probably want to just dub from your existing carts through your console to AXS. Record all commercial cuts, promos, PSA's, liners, jingles, drops and all other audio that will air on the station. Read the section on the AXS Production screen and all the options that can be used.
- AXS systems with Control room computer only and one dedicated Record/Play audio card: We assume that your AXS system recording input is connected to either your console or playback device. Dubbing your audio cuts initially should be no problem since the system is not yet on the air. Do start thinking about the procedures you will use to dub audio cuts after the AXS system takes the air. Note that some versions of AXS stand-alone systems that have an independent record/play device installed as well as the playback only device, it may be possible to record audio cuts on the Control room system. Please see the documentation on the Control room system elsewhere in this documentation.
- AXS systems with both Production and Control Room computer: Record your audio cuts on the Production room AXS system and use the automatic transfer to send the cuts to the Control Room or on-air computer over the LAN. This will also be the way that you do your daily production when the AXS systems go on the air.
[ ] Audio Cut Titles (Cuts 2000-9999)
The only cut numbers that can be used for recording digital audio cuts are those above 1999. All the cut numbers below this are used for control, user or rotator cut numbers. Please follow the suggestions in this documentation for arranging the audio cut numbers and for the best speed and control avoid throwing audio cuts in far flung locations. Try to keep as compact a group of audio cuts as possible. Try to plan ahead and group all the audio cuts for one client or sponsor together for convenience.
[ ] Rotation Tables (Cuts 0450-1999)
Once all the audio cuts have been recorded, it is time to consolidate all the commercial spots together under one cut rotator number for each sponsor and to assemble the user Schedule cuts, the Sub Fill cuts and all other non-commercial audio cuts into groups in Rotators. This is accomplished by creating Spot, User, and Fill rotation tables. Rotators are essential to easy operation of any digital audio system and provide great power and safety to the system.
- Entering a Cut Rotation: Select any valid Cut Index number between 450 and 1999. Remember that some of the Rotation numbers are reserved for specific uses such as Substitute rotation tables and Jock Schedule rotations. Press (Enter) to display the empty rotation table. Start entering regular audio cut into each field in any order that you want them to rotate. After you have entered all the cuts, press (ESC) to return to the Cut Index display.
- Standard Rotators (Cuts 0500-1999): Individual audio cuts from the Cut Index may be combined with other related audio cuts under a cut rotator number. This makes scheduling a "rotation" or related spots much easier and simplifies handling of spot ID's in Traffic systems. Desired audio cuts with music or features may also be entered into a Rotation. Please read the material on Cut Rotations in this documentation and establish the Rotator Cuts by inserting the proper Audio Cut numbers from the Cut Index into the table entries. In general all related Spots should be entered into one rotation, even if some of the audio cuts run only on specific days. AXS is smart enough to know that if a cut is not valid for a specific day or date that it should "skip" by it and find a "legal" audio cut.
NOTE: Even as flexible as Rotators are, Rotators may not be used inside Rotators.
- Jock Schedules: If you want to specify that a particular Jock or announcer voice airs during a specified period or work shift, you will need to establish a series of audio cuts linked by rotators that will stay in sync with the schedule. This must also be done if you are using a satellite delivered program format that requires that the local Liners, Jingles, ID's and other production be aired with the same voice that is used by the satellite source. These rotators are scheduled through the Real Time Scheduler (RTS) that is covered in detail later in this documentation.
- Sub Fill Commercial Spot Rotators (Cuts 0460-0469): (Optional for Live and Music stations) Designate some audio cut numbers to be used with the Rotator tables as Substitute tables. The audio cuts from these tables automatically try to replace an out-of-date or otherwise illegal audio cut that is on the Daily Log with another audio cut of the same length. Substitute table Rotators of specified lengths are also used to automatically "fill" spot sets to "time". Substitute cuts are generally Promo or PSA audio cuts, but may be any audio cut numbers that you wish to use. Be sure to read the sections on Sub Tables in this documentation.
NOTE: Satellite stations MUST NOT ignore this step. While the use is optional, these Sub cuts are crucial to the correct operation of the AXS system, particularly with Satellite program services. Without "Sub" tables, the AXS system will return to SAT channel if fill material is not present or due to a lack of legal program material.
- Sub Fill Promo Spot Rotators (Cuts 0470-0479): These selective Sub Fill rotators work with Promo (Type PR) spots only and offer additional variety in the fill routines. Not that the audio cuts that are entered into the Rotator tables can be any that fit your need.
- Spot Set Filler Rotations (Cuts 0480-0489): These cut Rotation numbers are used as various length spots to ensure that the spot Set is filled to time. These fillers are intended for use with satellite based systems and provide tremendous control. They are also an important part of the precision music fill system used in the music version of AXS. Enter as they fit your needs.
[ ] Cluster Markers (Cuts 051-0075)
(Optional for Live segments or users that do NOT "time" their spot sets) Cluster Markers are "control" titles from the Cut Index that identify the beginning of a timed spot set. Read the reference section in this documentation on Cluster Markers. When cluster markers are used, the AXS system can control the exact length of the spot set by using the optional set fill routines of AXS. You may edit the cluster marker cut numbers to fit the station needs as to spot set length, if necessary. If possible, however, use the ones that are already assigned to keep uniformity and aid in AXS support help. The standard cluster markers should fit almost every spot set length available.
The use of cluster markers if required on AXS systems using satellite formats with fixed length or precision length spot sets or if an external interface is used to a Traffic System and may be required by certain formats. This is done from the AXS Production screen. While some AXS formats may not require the use of cluster markers, it is generally a good idea to use them to define the spot sets to allow some Music systems to plot music layout more carefully.
- Special Music Cluster Markers (Cuts 0071-0075): Cluster marker titles 0071-0075 are variable length cluster markers that can be adjusted by the AXS Traffic and Music Combo interface to "fill" an hour to time. This is only valid on systems using Traffic and Music systems from Electric Works Corp.
[ ] Create Macros (Cuts 0350-0449)
(Optional) If you have complex program requirements that could be solved by creating repetitive segments that can be called from a single entry on the AXS Log or in the Real Time Scheduler (RTS), then define your needs, read the section on MACROS in this documentation and call AXS support if you have any questions.
[ ] Adjust Traffic Logs
Make any changes that are necessary in the cart our source number schemes in your Traffic system (if any) to produce a correct list of the cuts to play.
[ ] Backup
Be sure that you have a complete backup of all the audio cuts on your AXS hard drive when you are finished dubbing. Transfer all the cuts from your Production AXS system to the Control room or On-Air system via the LAN. This can also be done on a cut-by-cut basis by selecting a cut number, pressing the (F2) key to display the "Transfer" menu and then sending the cut to the proper AXS system. However, the fastest way to do this is to copy over the network. If you don't know how to do this, please contact AXS support during regular business hours.
CAUTION: If you don't have a backup AXS hard drive system, then this is the time to decide what you are going to do if the On-Air computer fails, as it may at some time. Make a plan now, don't wait until you are losing money by not getting your spots and programming aired.
[ ] User Titles (Cuts 0300-0399)
(Optional) Create any User Titles that you need to make your daily log more descriptive to the AXS operator. These are not audio cuts, they are for cosmetic use on your daily log only. They may also be passed to the AXS log by some traffic interfaces. The cuts give form and structure to your AXS log, specially if you do lots of Live or Live Assist.
[ ] Create Master Logs
If your staff has decided to handle the creation of AXS logs by hand without use of an interface from a Traffic system, then you will need to create Master Logs as templates that spots and other programming can be loaded into on a daily basis. After all the above information has been completed, follow the steps below to assemble your master logs.
NOTE: It is not really practical from a time stand point to attempt to load an AXS system by hand through master logs. While it can be done, it is necessary that the Log Edit program be on either the Traffic or Production computer and connected by LAN to the main Cut Index.
While some AXS systems come with a generic Master Log, editing is generally necessary for periods of Live Assist or when secondary audio programming sources are used. In a few cases, the station may not have a generic format and may need to build Master Logs from scratch.
This editing is done from the Log Editor. Using the supplied Control and Avail cut numbers, your Cluster Marker Cut numbers and any User Titles or markers that you have created, assemble a series of Master Logs that accurately reflect the on-air programming that you want. Follow the guidelines in this documentation.
NOTE: The AXS Log Editor is reached by selecting "Log Editor" on Start Screen. Please read the reference material on Log Editing thoroughly before building your Master Logs.
- Log Editing on Stand Alone AXS Control Room Systems: Systems that use a single stand alone control room computer for operation should not edit future logs or build new logs while the system is in operation. Editing the current log can be accomplished through the use of the (F9) edit feature. Editing of future logs or building a new log requires using the (Alt+F9) editing feature. This requires you to leave the AXS main screen to perform the editing and therefore should only be done during times when the station is off the air.
NOTE: If you are using a Traffic and Billing system and have the optional traffic interface software package, it is NOT necessary to create any Master Logs. The entire Traffic Log is transferred to the AXS Daily Log. The Master Logs in the Traffic system may have to have some minor formatting changes.
At this time, there are some other Traffic system vendors that have developed interfaces to AXS that should eliminate most of the Log building work. However, Shiny Stone Digital is not responsible for the accuracy of these third-party interfaces, nor for support of the interfaces or its interaction with AXS.
[ ] Special Programming Requirements
AXS is a very flexible system. When you inquired into the system you were asked as to any special requirements that your system might require. The system shipped to you is equipped to handle those requirements as they are explained to us. However, if this information was not provided, then in some cases either addition components or software or both may be required to meet your needs. If your station is using an alternate News network audio source, taking programming from more than one satellite audio source, using a program source that does not use a standard satellite receiver/decoder or if you have purchased the system with known special requirements of any kind, then the Logs and some of the AXS programming may have to be adjusted to accommodate these requirements. This work must all the done before you place the AXS system on the air. Quite often special work like this is time consuming so please leave plenty of installation and testing time for this. Contact AXS support during regular business hours to go over these special requirements.
[ ] Create a Daily Log for Testing
Most AXS systems are supplied with a sample Daily Log in the generic format of the programming service being used or in the general spot set format. This is generally perfectly adequate for testing the functions of the AXS system and its integration with a satellite receiver, and automation system or a live operator. Specific AXS logs will have to be created to adequately test the system.
Another approach is to use a Traffic system with an AXS interface and produce the Test Log directly from this unit. Loading this log will help you tune the Traffic system log to meet the needs of the AXS system.
If it is necessary to build a test log, either modify the log with the AXS system or use the Log Editor and a Master Log / Template Log and a current Traffic Log for the date, entering some commercial audio cuts into the avail positions. Save this Daily Log under any convenient date.
[ ] Test the Daily Log from the AXS Screen
Before any testing is done, double check to be sure that all audio cuts have been entered, rotators created, substitution spots created and loaded and that any Jock Schedules (if required) and other setup requirements have been completed. It will do no good to "test" a system with an incomplete setup.
From the AXS screen, load the test Daily Log, place the output of AXS into an audition source on the console and then run the Log. This will give you both a visual and audio test of the operation and will disclose any areas that have not been setup or have been overlooked. Call AXS software support with any questions.
[ ] Satellite Operation
If your station is using a Satellite programming service, test the operation of the audio cuts or rotators that are linked to the control closures to be sure that they are interacting correctly. Obviously, the physical installation of the computer, display, audio switcher, the satellite receiver closure wiring and the audio wiring should have been checked and double checked before this test is run.
[ ] Music Operation
Be sure that you have all of the audio and music (if any) cuts made and placed in rotators, that all Jock Cuts (if used) are available and that the interface from the music scheduler system is producing an AXS log that looks correct when it is loaded.
Take Your Time!
It is a serious mistake to try to rush the installation of a system like AXS. This system is going to be expected to duplicate and perhaps improve on an operation that is sometimes difficult for live persons to do well. In fact, AXS may be asked to perform functions that are almost impossible to do in live operations. There is a definite "learning curve" that the operators must go through and the system should be "fine tuned" in order that it is operating in exactly the way you want it to before it is released for long term operation. Throwing the system on the air with untrained people and in an unprepared manner will only reflect on the way that your listeners perceive your station.
[ ] Final Testing
With all audio cuts loaded and accurate daily logs in place, monitor the entire AXS operation for long periods of time to be sure that all the programming is accurate, that your audio cuts are tight and that they are of the right length, and that the overall "sound" is exactly what you want. This is the time to "fine tune" the operation before it goes on the air. Contact AXS support during regular office hours with any questions.
[ ] On-The-Air
When you are ready, place AXS on the air for extended periods of time under supervision. Make whatever corrections are necessary before you let the system operate unattended for any long period of time.
AXS "Hot Keys"
Single Key
| (F1) |
(F2) |
(F2) |
(F3) |
(F4) |
(F5) |
(F6) |
(F7) |
| Gets Help Screen |
Jock F/X Box Appears |
Displays Load Templates Window in Edit Blank Log Mode |
Quick F/X Box Appears |
Toggles Between Sweep and Live Mode |
Start Play in Green Play Panel |
Stops Play in Green Play Panel |
Stops After Even in Green Play Panel |
| (F8) |
(F9) |
(F10) |
(F11) |
(F12) |
(C) |
(E) |
(I) |
|
| Fades Event In Green Play Panel |
Activates Edit Mode for Air Log |
Select Digital Audio Windows Appears in Edit Mode |
Select Song Windows Appears in Edit Mode |
Allows a GoTo in Edit Mode |
Toggles Entry of CD or Digital Audio |
Toggles Edit Air Log Mode ON |
Toggles Info Screen ON/OFF |
|
| (J) |
(P) |
(Q) |
(S) |
(space) |
(space) |
(T) |
(tab) |
|
| Activates Jock F/X Pages |
Activates AXS Production Screen |
Activates Quick F/X Box |
Toggles Sweep Mode ON/OFF |
Toggles Expanded Log View 1 ON/OFF |
In Jock F/X Mode Allows Direct Page Selection and GoTo |
Returns Air Log to a Point In Line with Current Programming |
Toggles Between Expanded Log View 1 and Log View 2 |
|
| (V) |
(Z) |
(up) |
(down) |
(pgup) |
(pgdn) |
(esc) |
() |
|
| Toggles Expanded Log View 1 ON/OFF |
Gives Expanded Information On Highlighted Event |
Moves Black Bar Up One Event In Edit Mode |
Moves Black Bar Down One Event In Edit Mode |
Moves Black Bar Up 17 Events In Edit Mode |
Moves Black Bar Down 17 Events In Edit Mode |
Exits Current Screen or Activity and Returns to Main or Production Screen |
|
|
CTRL + Key
| (F4) |
(F5) |
(F6) |
(F7) |
(F8) |
(A) |
(C) |
(S) |
| Toggles System Between Live and Sat Mode |
Starts Play in Blue Play Panel |
Stops Play in Blue Play Panel |
Stops After Even in Blue Play Panel |
Fades Event in Blue Play Panel |
Permits Auditioning of Audio Cuts and Live Copy/Text |
Copies Selected Line to Edit Buffer |
Swaps Selected Line with Line in Edit Buffer |
| (T) |
(V) |
(X) |
(pgup) |
(pgdn) |
(home) |
(end) |
() |
|
| Time Reset To Include CMOS Clock |
Pastes Line From Edit Buffer |
Cuts Line To Edit Buffer |
Page Up 100 Events In Edit Mode |
Page Down 100 Events In Edit Mode |
Move To Top of Log In Edit Mode |
Move To Bottom of Log In Edit Mode |
|
|
ALT + Key
| (F2) |
(F3) |
(F5) |
(F6) |
(F8) |
(F9) |
(F10) |
(F11) |
|
| Load Log Window Pops Up |
Exits to Real Time Scheduler (RTS) When Allowed |
Start Play in Red Play Panel |
Stops Jock or Quick F/X By One Event |
Kills Current Jock or Quick F/X Event |
Brings Up Log Editor Screen |
Brings Up Production Screen |
Exits to Music Manager When Allowed |
|
| (F12) |
(1) |
(2) |
(3) |
(4) |
(5) |
(6) |
(7) |
|
| Exists AXS to Program Defined in EWC.INI |
Toggles AS-28 Channel 1 ON/OFF |
Toggles AS-28 Channel 2 ON/OFF |
Toggles AS-28 Channel 3 ON/OFF |
Toggles AS-28 Channel 4 ON/OFF |
Toggles AS-28 Channel 5 ON/OFF |
Toggles AS-28 Channel 6 ON/OFF |
Toggles AS-28 Channel 7 ON/OFF |
|
| (8) |
(A) |
(D) |
(I) |
(P) |
(T) |
(X) |
() |
|
| Toggles AS-28 Channel 8 ON/OFF |
Saves Edited Log |
Toggles Device Separation Column ON/OFF On Air Log In Edit Mode |
In Edit Mode Inserts 0030 Cosmetic Space Into Air Log. Log Must Then Be Saved. |
Toggles Protection ON/OFF In Production Mode |
Toggles Time To 12 or 24 Hour Format |
Quick Exit |
|
|
SHIFT + Key
| (F1) |
(F2) |
(F3) |
(F4) |
(F5) |
(F6) |
(F7) |
(F8) |
|
| Plays Quick F/X 1 |
Plays Quick F/X 2 |
Plays Quick F/X 3 |
Plays Quick F/X 4 |
Plays Quick F/X 5 |
Plays Quick F/X 6 |
Plays Quick F/X 7 |
Plays Quick F/X 8 |
|
CTRL + SHIFT + Key
| (F1) |
(F2) |
(F3) |
(F4) |
() |
() |
() |
() |
|
| Stops Audio Playback On Card 1 |
Stops Audio Playback On Card 2 |
Stops Audio Playback On Card 3 |
Stops Audio Playback On Card 4 |
|
|
|
|
|
Chapter 2 - AXS Main Screen
Overview
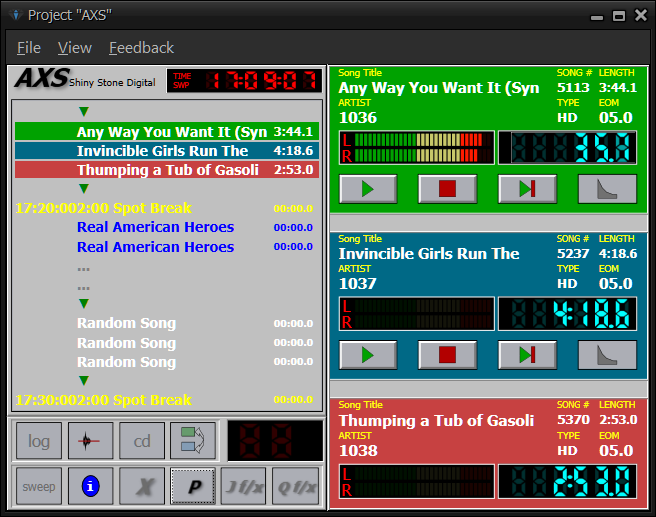
The AXS main screen is displayed below. On the computer screen, the three play panels on the right side are green, blue and red from top to bottom. The log panel on the top left is grey with the three lines as green, blue and red which reflect the play panel status. The control panel at the bottom left displays a series of buttons which are used to access the system. These buttons are identified by familiar icons which make operation easier. The clock at the top of the log panel displays the current system and system mode of operation, SWP for Sweep Mode, LIV for Live Mode and SAT for Satellite Mode.
(pic)
The AXS system does not limit operator control. While almost everything except event entry during system edit can be operated by a mouse, each function has a keyboard equivalent and many functions may also be operated by and optional external button box using physical logic closures. AXS will also fully supports touch screen operation. We suggest the monitor be at least 17" or greater for easy operation.
The Play Panels: There are three play panels stacked on the right hand side of the AXS screen. They are the event or cart NOW PLAYING (top green panel), followed by the NEXT TO PLAY (middle blue panel), and the READY PANEL (bottom read panel). This design is meant resemble the classic three stack cart playback machine. The top two play panels have individual operator controls. The look of each play panel changes slightly depending on the type of cut or event that is cued at the moment.
As each event is completed and the next is started, the panels change rapidly, moving toward the top or NOW PLAYING position. The panels shown are fora typical station operating in the Sweep Mode. The information fields can be changed by the user through the EWC.INI file. For example, the TITLE field can the changed to read SONG TITLE.
(pic)
CAUTION: Contact AXS support prior to making any changes to the EWC.INI file.
The Digital Audio Display
If the event in a panel is an audio cut, as it is in the bottom ready panel, the panel shows the cut title, the cut number, the cut length, the cut type, and the EOM or End of Message. If it is "00" seconds long, it means that on this cut there is no end of message to trigger the next event while the spot is still on. While there is no Sponsor name listed, this may be changed to read OUTCUE to provide the Jock with additional cueing information. With digital audio, a representation of a VU meter is shown.
(pic)
- The VU meter: The VU or level display is in the dark box under the sponsor caption. When the audio cut is playing, the playback audio level is displayed in graphic form. This level display is for guidance only and should not be taken as an absolute level indication.
Event Timer
The box to the right of the VU meter is the Event Timer. Before the event starts, it displays the total length of the audio cut. When the event is started, then it becomes a count down timer showing the minutes and seconds remaining in the cut.
Panel Buttons
There are four control buttons on both the NOW PLAYING and NEXT TO PLAY panels. The desired action can be started by pressing the button with a mouse, by pressing a function key or a remote push button.
(pic)
- The Play Button: If an event is in the top NOW PLAYING panel and the system is in Live Mode operation, then pressing the play button or (F5) key will begin the event. If the Play button or function key is pressed again while in Live or Sweep Mode, then it will stop or fade the event currently playing and move the event in the NEXT TO PLAY panel into the top NOW PLAYING panel. This may also be accomplished by pressing the play button for the event in the NEXT TO PLAY panel. The (F5) function key is active only in the NOW PLAYING panel.
(pic)
Pressing the (CTRL+F5) keys will start the event in the blue NEXT TO PLAY panel either fading or overriding the digital audio cut in this panel.
Pressing the (ALT+F5) keys will start the event in the red READY panel if it is cued and will skip over the event in the NEXT TO PLAY panel.
WARNING: The stations with more than one card capable of play back operation, moving an event out of the NOW PLAYING panel by pressing the play button in the NEXT TO PLAY panel, (CTRL+F5), or (ALT+F5) will cause the two events to overlap and should be avoided unless this effect is desired.
- The Stop Button: When this button or the (F6) key is pressed, the event is stopped and the system waits for the next Start command. Pressing (CTRL+F6) will stop play in the blue play panel. (pic)
- The Stop After Button: When the stop after button is pressed on either play panel, it will cause the system to enter the Live Mode after that event is over and wait for further instructions. The (F7) key may be used to place the green NOW PLAYING panel in the stop after mode. Using the (CTRL+F7) keys will place the event in the blue NEXT TO PLAY panel in the stop after mode independent of the stop after setting in the on air panel. This adds great flexibility for the jock or operator. (pic)
- The Fade Stop Button: This button and the (F8) key are active only in the green NOW PLAYING panel. When pressed the event playing will fade out and allow the event in the blue READY TO PLAY panel to advance. Using (ALT+F8) clears any remaining cuts ready to play in the Jock or Quick F/X boxes and returns the system to the regular mode of operation. (pic)
The Air Log Panel
The upper three quarters of the left hand side of the AXS screen contains the AXS air log panel. The log display panel is placed just under the AXS logo and the system time display. The log is the list of events that will be aired by the AXS system under operator control. AXS simply plays what is on the log, in sequence. The log can be viewed in two optional expanded formats that will be discussed later.
(pic)
The log can come from a lot of places. You can edit in to a blank log on the fly. If you don't have a traffic system with an interface then the AXS log can be created on the log editor that is supplied with the AXS Production room. It's even possible to use nothing at all in the way of a log. Edit in cuts as you go or just work out of the Jock and Quick F/X boxes as you go. The point is, that you are in control. AXS does what you want it to do, without much compromise.
This log can be loaded in through an interface from many popular traffic and billing system. Or, the log may be created by hand on the AXS log editor that is included with the production room system. In addition, the log may be created on-the-fly from the control room using the (F9) key or by pressing the edit icon on the control panel.
Notice that the three horizontal colored bars are placed on the event NOW PLAYING (green), the NEXT TO PLAY (blue) and the READY (red) event lines. As you may notice, they correspond to the colors of the play panels. Any spaces or events in between these lines will not be aired, but are there to give form to the log. The events shown on the log are also color coded according to the following scheme:
- WHITE - songs and HD type events.
- LIGHT BLUE - Time Announce events. (Optional feature)
- DARK BLUE - Rotator type events.
- YELLOW - Cluster Marker type events.
- BLACK - Digital Audio events.
- GRAY - Non-playable events.
Not only does the AXS log panel mirror the status of the events in the three right hand play panels, in the edit mode the log may be scrolled by the operator to check on upcoming or previous events and is used by the log edit and goto control buttons below to act as a work space. No matter what else the operator may be doing with the AXS system, the three play lines (green, blue and red) of the log are always available on the display.
The log displayed is in the Sweep mode. In the Live Mode the log shows a distinctive markers for the cosmetic space separations. If the space is a red cube in it, this is a signal that event sequencing will end after whatever is playing before. If the space has a green downward triangle in it, then events will sequence through. This lets the log designer create space without creating problems. Any of these spaces may be overwritten with spots or music inserts at any time.
Loading an AXS daily log
Pressing (ALT+F2) will bring up a window that can be used to change the currently loaded daily log or to import a new daily log to the list of available logs that can be aired. The log that is currently running is displayed in the loaded window. The bottom window shows the number of logs available and which log is highlighted by the cursor.
(pic)
- Load a Log: It is occasionally necessary to replace a daily log that is in use with another one. Use the (up) or (dn) arrow keys to select the date of the log to be loaded and press the OK button or the (O) key on the keyboard.
- Import a Log: This option is used to import a log from a floppy disk into AXS (aka "sneaker net"). To use this option, the import location of the log must be set up in the EWC.INI file under [PATHS] at the ImportLog=A line item. The log must also be in a format that is compatible with AXS. Insert the disk with the log you wish to import into the computer floppy drive and press the import button on the overlay screen or the (I) key on the keyboard. The load log window will be replaced with the import log window. Simply follow the instructions on this window and your log will be imported into AXS.
(pic)
General Log Editing
We assume that you have loaded or created a log and that it is now in the AXS system and is showing on the left side of the screen. In this case, just assume that your traffic person has loaded it last night, before you came on duty. By pressing (F9) or the edit icon, you can edit that log. The only things you must remember are that you must either use an empty space on the log, insert a blank line or overwrite an existing event. If you want to pick a digital audio cut or edit into the log, press (F10) to display the Select Digital Audio window. Then use the mouse or the (up) or (dn) keys to highlight the digital audio cut you want to place onto the log. Press (enter) or click the SELECT button in the window to place it onto the log. Rotators and Macros may also be entered in the same way. Press (esc) or the right hand button on the mouse to close the window. If you have hard disk music in your system and have a database from a compatible music play list generator, you can edit in new songs or cuts by pressing (F11) to display the select song window. The information in this box can be sorted and then displayed by Title-Artist, Artist-Title, or Length-Title by selecting SORT with the mouse and highlighting the option you wish to sort by and then pressing (enter). Then use the mouse or the (up) or (dn) keys to highlight the song you wish to select. Press (enter) or click the SELECT button in the window to push the song onto the AXS edit log. Press (esc) or the right mouse button to close this window.
You can flip back and forth between the scrolling edit screen and select digital audio / select song screens by just pressing the tilde (~) key.
Direct editing is even easier: If you know the audio cut or song title number that you want to place on the log, then go into edit (F9) and just type the cut number and press the (dn) or (enter) key to go on. Even the real time at the far left of the log screen can be edited by using the (tab) keys. Another method of direct editing can be accomplished by finding a cosmetic space or song avail, pressing (c) or (+) and then entering a song number. DO NOT select an event on the log that is already filled. Doing this will cause an overwrite and a digital audio index number will be entered in place of the song.
WARNING: ALL editing of the log currently running must be done utilizing the air log in (F9) edit mode. Editing the current log through the production computer and then transferring the edited log over the LAN or by importing it from a disk or by using the control room log editor will result in severe problems with AXS.
- Adding Time: Any event or line on the AXS log can have a time (hours, minutes and seconds) tag added to it. When in the edit mode on a line, then press (tab) to move the editor into the time columns on the far left. Enter the time that you want, then press (tab) again to return to the regular edit mode. In normal operations, the time display is for reference and may have been downloaded from the traffic system. However, in the Sweep and SAT modes of operation, these times may be used for update points to control the flow and content of the music or other program features.
-
AXS Cut Index Codes Reviewed: AXS uses a set of numbers called a Cut Index ranging from 0001 to 9999 to identify audio cuts, pieces of copy, user log titles, and control codes. Don't worry too much about these, there' very easy to use. Here are a few of the most used:
- Spot Avails (0004-0009): This is basic. Reserved Avail markers are the locations on the log that are reserved for spot sets. These avail sets can be placed at random with only relative time or they can be displayed with a time on the Master Log. However, most users will place a cluster marker with a time entry at the beginning of a spot set. At the beginning, just use cut number 0004 as a standard avail marker on the log. Spot or cut avail codes of various priorities. In most cases, just use 0004 unless you need a special avail marker.
- 0010: (Form Feed) (Optional) This cut is totally ignored on the log screen, but forces a printer to a new page when it is encountered during printing. If you are not going to print your AXS logs, then this cut is not necessary. This code is produced and used by the Traffic-to-AXS interface as well.
- 0011: A standard cosmetic space. Also used as an implied sequencing stop when in the Live mode. Shown on the log as a red cube.
- 0030: Cut number "0030" is a special cosmetic space used for log formatting that is ignored by the system in the Live, Sweep and Auto modes. It is used primarily for spacing out the log and to leave spots to edit into if required. In the live mode, it is shown as a green downward triangle.
- Cluster Markers (0051-0075): These reserved titles define the beginning point and length of each spot set for use in the AXS system. They can be located on the AXS log with or without a time as desired. Cluster markers should always be used in automated segments. There are two types of cluster markers: the most common is the option type (MK) which may or may be filled and the must fill type (MF) which requires that the AXS system automatically fill the spot set to avoid the consequences of a dead break getting on the air. These designations are placed in the type field of the cluster marker. These cluster markers are used to show spot set length. Useful, but not always required for AXS. They will however, be used in some advanced versions of AXS for better format control. Cluster markers are required for Satellite systems for spot set time control.
- Control Titles (0001-0299): These reserved titles are used to send signals to external controls or to make some special operation happen inside AXS. For example, control titles 0013 to 0015 are used on the log to switch modes between Live, Satellite and Auto modes. Control Titles are not always required. Before adding any control titles, always check with AXS support for advice.
- Jock Schedule Sensitive Cuts (0291-0299): These cut numbers are reserved for Jock Schedule Sensitive cuts. When one of these cuts is placed on the AXS log, these control cuts essentially duplicate the effect of the satellite closures or other programmed cuts. For example: If external closure #1 has been programmed into the system to start a rotation of ID audio cuts, then this same action will result when the cut number 0291 is encountered as an event on the AXS log. These special calls or cuts are especially useful in automated music operation because the cuts will follow the jock schedules to bring up the right voice at the right time.
- User Titles (0300-0399): These titles which are in the cut index area from 0300 to 0399 are for any non-audio or non-copy use you wish. Generally they are used to create a title that can be displayed on the AXS screen. These titles are just for use by the operator. They can be names of programs, reminders or for any other useful purpose. User titles are NOT required and need only be used if the station wants them. They add depth and readability which is especially important in Live or Live Assist periods of operation. They are not necessary as you begin to learn to create logs.
- Macros (0400-0449): Essentially a macro is a mini-log that can have up to 20 events. In general, anything that can be run on a regular log may be part of a macro. A macro can be used any number of times. Macros are ideal for handling complex switching from one audio networking to another, for involved transitions from music to satellite or vice versa, and for the special group of real time events that must be executed with precision. Macros can be in rotations on jock schedules and jock f/x too.
- Special Fill Rotators (0450-0499): These rotators are used to set up rotations of commercial, promo or PSA spots to eliminate the necessity to track multiple cut index numbers when assembling a daily log. When used as substitute tables, they can automatically replace a spot that is out-of-date or doesn't exist with one of the same length from a special set of substitute files. They may also be used to "fill" spot sets that don't have enough spots to meet the minimum set length time requirements.
- Cut Rotator (0500-1999): Any related group of audio cuts may be placed into a rotator with a specified ID number. When this number is played on the log, the next legal audio cut will be aired or displayed. Rotators are created and maintained in the AXS Production system.
- Audio Cuts or Live Copy (2000-9999): These numbers are used as the locations for all audio cuts and live copy recording during production. These cuts may be on several different hard drives or even on a different computer connected to the LAN.
-
Expanded Log Panel Views: The way events are displayed on the log panel can be changed by pressing the (space) or the (tab) keys. These views provide expanded information such as the song titles. The information displayed is taken from the Music Manager and Music Log databases. As a result, to take full advantage of these two expanded views you must have the above mentioned programs as part of your AXS system. Interfaces for other vendor system are not available at this time. However, upon request, a file specification sheet will be provided if your vendor wishes to provide you with an interface.
WARNING: Support for vendor supplied interfaces is the responsibility of the vendor and not Shiny Stone Digital. Nor is Shiny Stone Digital responsible for any adverse effects the interface may place upon the station operations. Users of vendor supplied interfaces must be prepared to remove the interface upon request of the AXS support technicians.
- Expanded Log View 1: This log view is activated by pressing the (space) key. In this view, each song is shown as a three line display showing the song title and song length (line one), artist name (line two) and memo information of up to four lines (line three) which is created in the Music Log database. Also shown are the cosmetic spaces, music avails and other information that normally appears on the standard log. It also has the three familiar green, blue, and red horizontal status bars. The information displayed in this view remains stationary while the status bars track down and eventually off of the screen completely. The (up) and (dn) arrow keys and the (pgup) and (pgdn) keys can be used to track the log up or down as required. Pressing the (T) key will track the event highlighted by the green status bar and all events below it to the top of the log. No editing of the log can be done from this view of the log.
(pic)
- Expanded Log View 2: This log view is activated by pressing the (space) and the (tab) keys. It also has the three familiar green, blue, and red horizontal status bars. In this view, each song is shown as a three line display showing the song title and song length (line one), the artist name (line two), and memo information of up to four lines (line three) which is created in the Music Log database. This view displays CD songs only no other events are shown. As a result there will be occasions when only one or two status bars may be showing. The events will remain stationary while the status bars track down and eventually off the screen. The (up) and (dn) arrow keys, (pgup) and (pgdn) keys, and the (T) key must be used to track the events up and down the screen as required. No editing of the log can be done from this log view.
(pic)
The Control Panel
At the bottom left hand side of the AXS screen is the control panel. It contains a number of buttons that add a lot of power to the system. The panel buttons are activated by using a mouse. The button actions can also be duplicated by pressing the appropriate function or keyboard key. The panel also contains four card status lights, an intro timer and other informational cues. (pic)
- The Edit button: Pressing the edit button or pressing the (F9) key or the (E) key places the log into the edit mode and activates the audio cut, music and GOTO buttons. The air log screen will change into a dense display mode. A black scrolling cursor bar will appear which may be moved rapidly up and down using the (up) and (down) arrow keys or the (pgup) and (pgdn) keys. Any event line may be modified in this mode. Until this button is pressed, the audio, music and GOTO buttons are inactive and become active only in this mode. If you wish, you may press (ALT+F9) and a blank edit log will appear in a new window. You must be aware that this is a blank log; to use it the operator must be familiar with the music database and cut index for proper selection of events to be entered on the log. There are several special features available when in the edit mode: (pic)
WARNING: ALL editing of the log currently running must be done utilizing the air log in the (F9) edit mode. Editing the current log through the production computer and then transferring the edited log over the LAN or by importing it from a disk or by using the control room log editor will result in severe problems with AXS.
- Log Insert: While in the Edit screen, select an event immediately before the point in which you wish to force a new line. Then pressing the (ALT+I) keys in sequence to make a new line holding a 0011 cosmetic space. After the new line is created, then any cut index number, rotator, audio cut or music selection may be placed into this line in the normal fashion. The insert function must rewrite the entire log to hard disk each time it is used. Therefore, using the insert function may be relatively slow and should be used only in emergencies. It is much better to plan ahead and leave adequate spaces on the AXS log instead.
- Zoom: When in the edit mode, pressing the (Z) key will zoom up all available information on the audio cut or song title. The zoom dialog also displays any "memo" information on a song title that may be available in the music database. Press (esc) to exit this dialog box. (pic)
- Track: Pressing (T) will make the edit screen track or line up with the air screen. Using the (esc) or right mouse button will return to the air mode.
-
Auditioning Audio Cuts: While in edit mode, you may:
- Audition a single audio cut.
- Audition the next scheduled audio cut within a rotator.
Simply move the black cursor bar to the audio cut or rotator you wish to audition and press (CTRL+A). This will cause any overlay to appear and then the audio cut will play. With rotators, as you move down the log to the same rotator again, only the audio cut you have selected as the next to play will be auditioned as AXS sees this as the next scheduled audio cut.
WARNING: This feature requires that a dedicated production audio device be set up in the EWC.INI file. It should not be used on the control room on-air system as audio overlap will occur during auditioning.
-
Previewing Copy: While in the edit mode, you may:
- Preview a single copy cut.
- Preview the next schedule copy cut within a rotator.
Simply move the black cursor bar to the copy cut or rotator you wish to preview and press (CTRL+A). The copy will appear over the play panels in its entirity allowing you to preview the entire text of the copy. As with audio cuts in a rotator, AXS will only preview the next scheduled copy cut within a rotator.
-
The Audio Cut Button: For this option to function, the AXS system must have a suitable audio cut database loaded and you must be in edit mode. These cuts may be edited directly into the air log. To do this, use the (up) or (dn) arrow keys to move the black cursor line to the place on the air log you want to edit the audio cut into. Click on the button or press the (F10) key to get the select digital audio window to appear. Then use the arrow keys, the mouse or the buttons at the bottom of the presented window to select the audio cut or rotator cut you wish to use. Then press (enter) or click the SELECT button to place the cut on the air log. The tilde (~) key above the (tab) toggles between the edit screen and the select digital audio window. Use (esc) or the right mouse button to exit. (pic)
-
The Music Button: For this option to function, the AXS system must have a suitable music database loaded and you must be in the edit mode. These songs may be edited directly into the air log. To do this, use the (up) and (dn) arrow keys to place the black cursor line on the location where you want to place the song. Press (F11) or click on the button and the select song window will display on the screen. Use the arrow keys, the mouse, or the buttons at the bottom of teh window to select the song that you wish to edit into the air log. The press (enter) or use the SELECT button to place the song on the air log. The tilde (~) key above the (tab) key toggles between the edit screen and the select song box. Use (esc) or the right mouse button to exit this window.
As a convenience when selecting music, you may sort the music database by either title or artist and then may go to the general area of the database by pressing the first letter of the artist or title name. This seek is fast and efficient. At this time, only a single index is available at any time.
WARNING: Both the music edit and database functions are dependent upon using a music selector system that can produce an interface file that is compatible with AXS and its log. It is up to the music database supplier to produce these compatible files to the standard specification which we supply.
-
The GOTO Button: When in the edit mode, if the cursor is placed on a log event and the GOTO button or the (F12) key is pressed, then the next event to play will become the event highlighted by the cursor. The edit screen grays a little if the GOTO area is too close to or behind the present stack of events that are ready to play. If this occurs, a GOTO is not permitted.
-
The INTRO Timer: Systems that use Live Copy or systems that using music use this INTRO timer display to let the jock know how much time is remaining. It will use the intro time from the play panel and start a count down. The inside right portion of the intro timer display also holds status information. This information is as follows:
- PBR (Programmed Background Record): Lights when the scheduled time for the PBR has been reached in the Real Time Scheduler.
- UPD (Update): Lights when an update is executed.
- CUE: N/A - Obsolete.
- RTS (Real Time Schedule): Lights when running events in RTS. Changes to blue when the last RTS event has been executed.
- AUD (Audio): Indicates that digital audio is playing.
- Card Status Lights: Immediately above the intro timer is a series of four lights. These lights will illuminate to indicate the status of the system audio devices. AXS has the ability to handle four audio devices. The device status is indicated by the color of the lights. A gray color indicates that no device is installed in that position. A green light indicates that a device is installed, but is currently inactive. A red light indicates that the device is in the playback mode. A yellow light indicates that the device is in the record mode.
-
The LIVE/SWEEP Button: This button or the (S) key will toggle the system between the Live mode where everything is under the control of the jock or operator and the Sweep mode which disables live Copy, Tags, and other events that could keep the system from moving event-to-event without interruption. The Sweep mode is most useful in systems that have music sources. Sweep means just what it sounds like. Events from the log are played in sequence without stopping unless the jock physically takes over. In the Sweep mode, all live Copy and Tags and other formatting codes are ignored. Sweep mode can be locked out permanently if desired when setting up the AXS system. While in the Sweep mode, the blue colored abbreviation SWP will illuminate within the system time box at the top of the log panel. For stations that have Satellite capability using (CTRL+F4) will toggle AXS between the Live and SAT modes. The abbreviation LIVE or SAT will appear in red inside the system time box.
NOTE: AXS may be placed into Live, Sweep or Satellite mode by special cut numbers placed on the log. Cut 0013 is the Sweep mode. Cut 0014 is the Satellite mode and Cut 0015 is the Live mode. These commands can modify the effect of the Live/Sweep button if it is used.
-
Live Mode: While in this mode, the abbreviation LIV will appear in the time box above the log. The numbers in the count-down timers on the play panels are displayed as an intense red. When the timer reaches 10 seconds or less the color changes to yellow. Each event can be under direct jock or operator control. Events will sequence until a cosmetic space (cut index number 0011) is reached. This cosmetic space is indicated by a small red cube (0011) in an event line. Special cosmetic spaces that are used only for formatting purposes are displayed as a green downward triangle (0030). These green spaces do not stop event sequencing. If the mode is changed from Sweep to Live while an event is airing, then that event will be forced into the Stop After mode and all sequencing will stop at the end of play.
- Live Tags: Tags will display as soon as the spot with the audio cut begins. Pressing (F5) to start the next event. Press (esc) to clear the Tag.
- Live Copy: In the Live mode, each piece of live copy will preview on the red and blue play panels before it is "aired". Short pieces of copy will be scaled to fit into the top play panel, while longer pieces will take up all three panels. The intro timer counts down the specified length to help with pacing. However, the timer has absolutely no effect on the start of the next event in sequence. To leave the copy after you are done, press (F5) to advance.
-
Sweep Mode: While in this mode, the abbreviation SWP will appear int he time box above the log. The numbers in the count down timer display will be a bright blue until the timer reaches 10 seconds or less and then the color changes to yellow. Copy and Tags are ignored. In the stand alone cart machine mode, the sweep operation will continue from event to event in sequence. Cosmetic spaces and cluster markers are ignored.
- Music Systems: When the system as long form programming available, then AXS will play events until it is toggled into the Live or Sat mode or until a Stop After button is enabled on a play panel.
-
Satellite Mode: When in this mode, the abbreviation SAT will appear in the time box above the log. The event timer numbers are blue and the log display shows the red cube indicating a cosmetic space (cut number 0011). In this mode, the system will sequence until it hits a cosmetic space. Then it will switch away to satellite or any other programming source that is available to a designated source channel on the audio switcher. In this mode, the cosmetic space cut number 0030 is ignored.
-
The INFO Button: Pressing this button or the (I) key will bring up the AXS Information screen. This is a system diagnostic screen that assists the AXS support staff when they are called upon for help. This is a read only screen. While in this screen, the AXS system log continues to operate in the background. It covers that main control screen and uses the top portion to give the operator the system time, time status (countdown) on the event currently running, and the events in the play panels that are running.
Obviously, the system should be running in the SWEEP mode when the info screen is in use, or the system should be halted. Otherwise the system may stop because of lack of program material.
-
The XTERNAL Button: Pressing this button or the (X) key will pop up a control window for use with AXS systems that have the AS-28 or DMX-4 stereo audio switchers or a logic gate that may be adapted by the user for custom applications.
- The AS-28 Switcher: With systems that have the AS-28 switcher installed, a switcher control window will appear with eight buttons. Each button represents a separate channel for the switcher. The buttons can be personalized to the function that it serves through the Audio Control section of the EWC.INI file. The channel is activated by pressing the assigned button number (1-8) or using the mouse.
- The DMX-4: With systems that have the DMX-4 installed, a window will appear with four buttons and four sliding channel volume controls. Above each button is a light that illuminates when the button is activated. To change the active channel button use the (left) or (right) arrow keys. When a button has been activated, the associated slider volume control button can be moved by using the (up) or (dn) arrow keys or the mouse. Smoother operation of the slider button is achieved through the use of the arrow keys. Any adjustments made to the channel volume will be lost upon exiting the software and the system will return to the default values as set in the Audio Control section of the EWC.INI file.
-
The Production Button: Pressing this button, (P) or (ALT+F10) while in the main screen will bring up the Production window. This is the screen that you will use to edit, create and maintain your audio cuts. To exit the window, press (esc) or click the right mouse button. AXS control room systems that have an independent record/play device installed may create and playback audio cuts in the foreground while the log events are playing in the background by using the Production screen.
The audio record/play device used for Production should be provided with its own audio input from the console or other source and the output of the record device should be attached to a monitor amplifier with its own speakers and/or headphones or a separate board channel with a cue capability.
TECHNICAL NOTE: The Production window may be used to maintain the cut index if a dedicated record/play device is not installed in the control room system. It is not possible to record or playback any audio cuts, but the maintenance capability can be very useful.
WARNING: It is assumed that the AXS system is in the sweep mode or that it has been stopped programming is originating from other audio sources the Production screen displayed. Only limited control of the background log events are available from the Production window if the system operator tries to use Live simultaneous operation.
At the top of the Production window is a monitor panel that displays the three current events to play, a count-down timer for the current event, the real system time, and four device status lights.
(pic)
There are three special key combinations for controlling background log events:
- (SHIFT+F5): Start the next legal background log event.
- (SHIFT+F6): Stop any log event running in the background.
- (CTRL+SHIFT): For stations with multiple audio devices, these keys used in combination with the (F1), (F2), (F3), and (F4) keys will stop the audio playback on devices 1, 2, 3, and 4.
Limitations: Because AXS is running many procedures simultaneously, there are some limitations to this kind of operation as compared to a simple stand alone Production room system.
If the independent Production record/play devices is also used for PBR (Programmed Background Record), then any foreground record will be aborted if the PBR event starts. One solution is to install an additional independent PBR audio device to separate the functions. An AXS system can handle any combination of record/play or play only devices up to four audio devices maximum.
Unless the system is stopped, it is not possible to create audio cuts and then transfer them to another Production or Control room over the LAN.
No other overlay screen like the Jock F/X, Quick F/X, RTS, log editor, load logs or other similar screen may be displayed while the Production window is being used, although external button boxes will continue to operate without a problem.
- The Jock F/X Button: Pressing this button, the (F2) or (J) key will cause the Jock F/X page screen to appear as an overlay on the main AXS screen. There are 99 Jock F/X pages available, each with 28 buttons on each page. Each operator or jock can create and use their own library or tool kit of liners, jingles, ID's, sound effects, rotations, macros, closures, or audio cuts. This tool kit is developed using the Jock F/X button. Jock F/X will do just about whatever your imagination can create. It is a tool that a good live operator or jock can use to make themselves sound better than they ever have. And, it has uses far beyond the control room. Even when it is on the display screen as a foreground operation, the main AXS system remains at the ready or in operation in the background.
(pic)
Pages may be flipped rapidly using the (pgup) and (pgdn) buttons at the bottom of the screen to reach a new location, or by pressing the (space) and entering the page number you wish to jump to. Once a page is selected, it is automatically displayed each time the Jock F/X button is pressed. This page will remain active even if the Jock screen is not up. This allows the use of pre-programmed keys, button boxes, or external logic controls to play any cut at any time. Jock F/X may also be operated by touch screen if desired.
Alternate Jock F/X Activation: The Jock F/X buttons are designed for live operation. It wouldn't make much sense to use it during a sweep session. However, it is available, but only if you have two audio devices with playback capability. We assume, however, that the AXS system is in the Live mode. There are several ways to start the Jock F/X buttons even when the screen is not visible.
-
The Keyboard: The following keys are mapped into a 4 by 7 matrix that simulates the Jock F/X screen layout when the (scrlk) key is toggled on. For instance: If the (scrlk) key is on and you press the 1 key, the audio cut in the top Jock F/X button on the left will play.
| 1 | 2 | 3 | 4 | 5 | 6 | 7 |
| Q | W | E | R | T | Y | U |
| A | S | D | F | G | H | J |
| Z | X | C | V | B | N | M |
-
Button Box: We strongly suggest that a button box set up in a 4 by 7 matrix be used by all customers that will depend upon the Jock F/X for much of their operation. A button box adds a lot to the speed and flexibility of the system. There are number of different kinds of button boxes that are available and there are also provisions to supply logic closures for users that want to construct their own boxes.
-
Touch Screen: Users that want to keep the Jock F/X up continuously may want to consider the uses of a touch screen.
-
External Switches: Jock F/X buttons can be mapped to external button boxes using IOMAP. Ask AXS support about this feature before entering the IOMAP.
-
Jock F/X Audio: Jock F/X uses the regular audio devices from the main AXS system. It can be set to use a dedicated audio device of its own, or any dedicated record/play device that may be installed in the system for Production or PBR. So the number of standard playback sources in the system determines the overall audio availability of the Jock F/X.
-
Timing Jock F/X Audio Cuts: There is no count down or count up timer available on the Jock F/X page screen. There are several reasons for this. First, the Jock F/X will be used without being displayed during a large part of the time. Second, with multiple audio devices available, and with the possibility of very fast overlaps and intercuts between audio cuts, a single timer would be useless. The only real disadvantage to the lack of a timer is to the user that puts a very long feature or program length audio cut into a Jock F/X button for convenience of play.
-
Other Jock F/X Applications: There are a number of additional ways to use the Jock F/X feature creatively. Here are just a few ideas:
- Special Events: Set up one or more Jock F/X pages with all of the spots and features that would be used during a special event like a ball game or remote. Then have the live operator punch off these events on cue.
- Request Jock F/X page(s): Create requested music on hard disk and edit the selections into one or more pages.
- Non-broadcast use: In a stadium or auditorium, set up Jock F/X pages by inning, by scene, by selection or in any group or sequence that is convenient.
The top part of the Jock F/X page screen has a monitor for the AXS background operation this is the same as the monitor on the Overlay Production screen. Even through the Jock F/X page is displayed, the operator still has control of the main log operation with the key combinations below:
(pic)
- (F5): Start the next legal background log event.
- (F6): Stop any log event running in the background.
- (ALT+F6): May be used to stop all Jock F/X play.
- (CTRL+SHIFT): For stations with multiple audio devices, these keys used in combination with the (F1), (F2), (F3), and (F4) keys will stop the audio playback on devices 1, 2, 3, and 4.
The bottom of the Jock F/X screen contains the control buttons for the background AXS operation as well as a few buttons for use with the Jock F/X. The Play, Stop, and Stop After buttons have the same function here as they do on the play panels. The Page Up and Page Down buttons are used to move through the Jock F/X pages and the Edit key is used to activate the edit function for the Jock F/X buttons.
(pic)
The Jock F/X pages cannot be displayed over the top of the Production window or any of the other windows/screens that make up the AXS Control room. When a MACRO is running, Jock F/X may not be operated over the top of the main AXS screen, and all touch screen and mouse functions are disabled. However, if the Jock F/X button is operated by an external button box or the keyboard, then any key or button that is mapped to the Jock F/X button will operate at any time.
-
The Quick F/X Button: Pressing this button, the (Q) or (F3) keys will bring up the Quick F/X window. This is a multi-purpose instant access feature that adds great power to AXS. Each of the eight Quick F/X buttons hold up to 10 audio cuts that may be played in sequence or under formatted control. When used with an optional external button box, each of the eight buttons may be played instantly without pressing any keyboard combinations. (pic)
-
Creating a Quick F/X Play list: Creating one or more Quick F/X play lists is very easy. There are just a few easy steps: (pic)
- Press (F3) or (Q) to display the Quick F/X buttons on the screen.
- Click on the Edit icon at the top right of the box or press (F9) to enter the edit mode.
- Select Button: Use the arrow keys to highlight one of the eight buttons available and press (enter). A Quick Edit box covering the middle and bottom play panels will open on the lower right side of the screen. The cursor will be on the first entry line. (pic)
- Entry: Type in a valid cut or rotator number and the cut description, type and length will be displayed. Press the down arrow to go to the next event in the play list. Up to ten event lines may be entered. Copy and Macros are not allowed.
- Title: Create a title for the Quick F/X by pressing the (up) arrow until it reaches the colored title box at the top of the panel. An entry field will appear. The name you type in will appear on the Quick F/X button itself when it displays. (pic)
- Exit: Press (esc) to get out of the Quick Edit mode and use (esc) again or press the right mouse button to leave the Quick F/X window.
-
Editing: Editing a Quick F/X button play list is just as easy as creating one. Just follow these steps:
- Press (F3) or (Q) to display the Quick F/X buttons on the screen. (pic)
- Click on the Edit icon at the top right of the box or press (F9) to enter the edit mode.
- Select Button: Use the arrow keys to highlight one of the eight buttons available and press (enter). A Quick Edit box covering the middle and bottom play panels will open on the lower right side of the screen. The cursor will be on the first entry line.
- Edit the Play list: Use the buttons at the bottom of the Edit box to Insert (ins) or Delete (del) an event or use the Clear (clr) button to erase the entire play list and start from scratch.
- Exit: Press (esc) to get out of the Quick Edit mode and use (esc) again or press the right mouse button to leave the Quick F/X window.
-
Playback: When the Quick F/X window is visible, any of the quick buttons may be started by pressing the keyboard numbers (1) through (8) or by clicking on the button itself. When a Quick F/X event list is playing, it is displayed at the lower right of the screen where the READY play panel is normally placed. From the keyboard, pressing the key combinations (Q) + (1) through (Q) + (8) will start whatever is in the Quick Key for that number. If there is more than one event in the box, it will be played.
WARNING: To avoid conflict with the Jock F/X, the (scrlk) key should be toggled OFF.
Live Copy Text
When the system is in the Live mode, AXS can schedule and display live copy text that has been created in Production for the jock on the screen.
Not only is the live copy displayed, it is previewed as it moves up through the play panels. The jock has plenty of time to prep for phrasing and length.
(pic)
The copy appears first on the bottom READY panel and will move up as the event progresses to the top panel. Regardless of the length of the copy file, the copy display is scaled to take up only the space occupied by the panel it is currently in. When it progresses to the top panel it will cover all three panels regardless of the actual length of the copy.
When the copy reaches the top play panel, a count down timer running in the intro box lets the jock place the copy to time. Press (F5) or (enter) to start the next event and (esc) or press the right mouse button to clear the copy screen.
(pic) (pic)
Copy may be scheduled on the current AXS log in the same way that audio cuts or music are placed. The type "CP". A cut with this type can also have an audio file. If AXS is in the LIVE mode, the audio will play and the copy will be displayed. If AXS is in the SAT or SWEEP mode and the cut is schedule, only the audio will play.
Live Tags
In addition, for digital audio cuts that require live TAGS, the AXS screen will display the tag for the jock to air at the end of the spot. Again, the jock has control of the switch away to the next event. Tags are also created in Production. (pic)
Press (F5) or (enter) to continue the sequence after the Tag has been "aired". Then press (esc) to clear the tag from the play log.
The Audit Log
The AXS system writes its audit log to a file as it goes. The audit log is dated and saved indefinitely. It can be displayed or printed on the Production room system in the log editor. The Audit Log tries to provide a record of events that are missed when the system reboots after a power failure or when a long update is done. However, careful manual checking should be done to verify this record.
-
Main Screen Audit Log: If you are in the AXS main screen and want to see the audit log, simply press (CTRL+A) keys to view the log for digital audio events or (CTRL+S) to display the songs. This will bring up the most current twenty events on the log that is currently running. To view any prior remaining events on the audit log press the (pgup)/(pgdn)/(up)/(dn) keys. A small window in the upper right hand corner of the screen will display the log event number range that you are currently viewing. On systems using music, a separate music audit log file is created in order to keep the size of the main audit log to manageable proportions. To discover what action was taken for a particular event check the Seg column for the following codes:
- P: Played
- X: Did Not Play
- S: Sub Fill
The S = Sub Fill will only occur if you have sub fill set up in the INI file. Check with support to see if you have the proper entry to allow sub fill. If you have a control room only computer AXS system this is the only available way of displaying an audit log. Logs called up using this method can not be printed out.
-
The Log Editor Audit Log: An audit log may also be displayed and/or printed when viewed using the Log Editor. This is available on AXS systems with a separate Production room computer. Select the Log Editor. Then press (F4) (Load) and select audit from the drop down menu. Select the audit log you wish to view and click OK. The log displayed will contain the digital audio events for the log selected. You may print this log by pressing (F2) (verify) and selecting one of the print log options or by pressing (CTRL+F7) (print log) or (CTRL+F8) (print marked log) and the log will print.
Chapter 3 - AXS Production Screen
Overview
The Production window is capable of audit cut production, cut index maintenance, cut rotation creation, and the entry of live tags and copy. We recommend that all people who are going to use AXS Production sit down with the computer, display the Production window and follow the procedures described in this chapter. The Production window is the central point of any AXS Production Room operation. Nothing can go on the air if the audio hasn't been recorded here. Each new AXS system that is factory assembled comes with a complete cut index and some sample audio cuts pre-installed, so it is ready to go as far as running the system. From the Start Screen, select "Production". From the Main Screen, press the (P) key to launch.
Production Screen
This is the primary cut maintenance and audio cut production area. All spots and other digital audio should be produced from this screen. This Production system is designed to be used on a separate computer connect to the Control room via the LAN. The Production window has the following features:
- Card Status Lights: Located at the top right corner of the screen, these lights serve the same function as the Card Status lights on the Main Screen.
- Cut Index: The middle of the screen is where the Cut Index is displayed. You may move through the index by using the (up), (dn), (pgup), (pgdn), or simply type in the cut number (if known) and press (enter).
- Record/Play Section: This section is used to record and play back all types of audio cuts. It contains three buttons (Play, Stop, Record) that are activated by using the mouse, touch or the (F5), (F6), or (F7) keys. The length of the cut is displayed in the time window. Below the time window is the EOM button. Pressing this button or the (F8) key will place an EOM on the audio cut currently being played. There is a red light inset into the letter O. This will illuminate when an EOM is being recorded or when an EOM is detected during playback. To the right of the time window and EOM button is the VU Meter. This two channel (left/right) meter allows you to monitor signal strength during record or playback of audio cuts.
(pic)
- Utility Keys: Immediately below the record/play section are the utility keys. These keys add more features to the Production screen and will be discussed in detail later.
Note: It is possible for the main Production room to work either as a stand-alone unit using its own local cut index and saving to its own hard drive or to connect to the hard disk of any remote (LAN) machine.
Overlay Production Screen
Stand-alone AXS systems with only one computer must use this screen for audio cut production. Some AXS control room systems have an independent record/play device installed that can be used for audio cut production instead of the production room system. From the AXS Main Screen press (ALT+F10) or (P) to display this Production window which "overlays" the main screen. This overlay Production screen has all of the features offered with the standard Production screen. The main difference is that at the top of the overlay version you have an events window showing the events currently in the play panels, an on-air count down timer, a system time clock and four device status lights.
(pic)
Selecting an Audio Cut
Preplanning and organization of audio cuts is important. You may wish to subdivide categories by specific criteria. For commercials, you may wish to put :30's and :60's in separate defined sections. For satellite liners, you may want specified cut number ranges for certain announcers. In formats that use links or intros of any kind, special care should be made to keep all the audio cuts for one jock or operator together so that they may be cut in sequence. Also, sweep intros that are placed on the log should be in sequential order so that the jocks may cut them by voice in order. Separate sweep liner sets for specific days may be used so that liners may be cut in advance.
To do any audio work, a cut must be selected before the cursor can move to the audio section. When AXS Production is first loaded, cut 2000 is on the top line and is selected automatically. Any cut index line may be displayed in the following ways:
Note: Spot recording of audio cuts is not allowed on cut numbers under 2000. In most AXS systems all audio spots including commercials, ID's, liners, PSA's and promos will be recorded between cuts 2000 and 9999. The cut index has been organized so that specific cut numbers store specific kinds of information.
- Direct Selection: With the highlight bar on any cut number, simply type in the new cut number and then press (enter). The system will instantly go to that cut and display it as the top highlighted line.
- Single Step: Us either the (up) or (dn) arrow keys to move the cursor one step at a time.
- Page: Use the (pgup) or (pgdn) keys on the keyboard to shift the screen one "page" at a time.
- Extended Page: Use the (+) or (-) keys on the keyboard to move ahead or back 100 cuts per time.
- Convenience Keys: Pressing the (home) or the (H) key on the keyboard will move to cut 0001. Pressing the (end) or (E) key on the keyboard will move the cut to 9999. Pressing the letter (M) key on the keyboard will move to cut 2000 which is the start of the audio cut index numbers.
- Mouse: Any cut line on the screen may be selected or highlighted for use by clicking on that line.
- Leaving the AXS Production screen: Except when you are in the cut index edit mode or are playing or recording an audio cut, you may exit the Production screen by pressing (CTRL+esc). Press (esc) to leave the overlay Production screen and return to the Main Screen.
The Cut Index Header
Each cut number that is used for digital audio has a header attached to it that describes the cut completely. The cut header is a separate file from the audio cut itself. An audio cut cannot run without the cut header. Movement of the cursor bar within the header box is accomplished by pressing the (enter) key or by clicking on the field you wish to be in.
- Creating or Editing the Header: Select a cut index number by typing the cut number (2000-9999) in the first field (cut #). Press (enter) and the cut header will display. You may also scroll up and down using the arrow keys, the mouse or (pgup)/(pgdn) to browse through the cut index until you find the cut you wish to create or edit. Move to the line on the screen and press (enter) or double-click on the line to display the cut header entry box. Then enter or edit the following:
NOTE: Some of the information entered into the header fields is displayed in the production screen columns. These items are indicated by BOLD type.
- Cut #: This is the cut index number that is the main reference to a specific audio cut, piece of copy or a control title.
- Description: (Required) This is simply the NAME of the cut.
(pic)
CAUTION: The cut type is used by the AXS system as a control device. It is very important that all cut numbers have the correct type in place.
- Mono/Stereo (M/S): AXS systems that have stereo record/playback capability may play mono and stereo spots interchangeably. The system is generally defaulted to MONO in the system setup. So each time a cut index line is created, the MS field is automatically defaulted to M (mono). This can easily be changed by the user in the field. If you want to change it for this particular cut, then move the cursor bar to this field and enter either an M or S into the field. This can also be changed while the Production screen is up by pressing (ALT+M) (mono) or (ALT+S) (stereo) without calling up the cut header. You must enter and M or S prior to recording.
- Artist/OutQ (Optional): When used with a music audio cut, the artist name will display on the play panel of the audio cut. When used with regular cuts for spots, etc., then the field may be used to display the last few words of the audio as an "out cue".
- Intro: Used for music to let the operator and the system know how much time is available for an intro or opening to a music selection. This information must match the intro time as loaded into a music scheduling system and the cut type must be "HD" for the intro timer to operate.
- EOM (End of Message): With the placement of an EOM signal on an audio cut, any other event may be started with a specific overlap time. An EOM is determined by the number of seconds prior to the end of a cut (overlap) you wish to allow the next event to start. EOM marks may be placed while recording or playing back an audio cut. This will be displayed in the EOM field of the header as seconds and tenths of a second. If known, the EOM length may be edited into the cut header by moving the cursor bar to the EOM field and entering the required number of seconds and/or tenths of seconds. To enter an EOM while recording or playing back an audio cut, simply wait until you reach the point at which you wish to insert the E?OM and then press the (F8) key or click on the EOM button. If a previous EOM signal exists, it will be erased and the new one will take precedence. In live and music systems, this signal can add to the production value. It is particularly important when the link codes that provide intros for music tracks are used as well as liner log plays and other events where tight production is desired.
- Tertiary: (Future Use)
- Start Date (Required): Enter the starting date for this cut. You do not have to enter the slashes. Press (enter), then the current date in the computer will be entered.
- End Date (Required): Enter the ending date for this cut. You do not have to enter the slashes ("/"). If you simply press (enter), then "T /F /N" (Till Further Notice) will be entered. No end date will be checked on T/F/N. If you enter an end date that is not the same or later than the current date in the computer, the cut index header line will display in RED. This is to warn you that you may have entered a bad date.
NOTE: By editing the "tfn=" parameter in the EWC.INI file, the TFN description can be changed to any combination of 8 characters.
- Protected (Y/N) (Optional): Any audio cut may be "write protected". By entering a "Y" into this field, the audio cut can not be recorded over or erased without answering a question popped onto the screen. We suggest that all PSA's, promos, liners, ID's and other standard material be write protected. A cut may also be write protected form the Production screen by highlighting it and pressing (ALT+P).
-
Skip Days (Skip Days of Week) (Optional): This is a numerical entry that allows each audio cut to run on selected days only. By filling in this field with the week days (Monday=1 through Sunday=7) that the audio cut or spot should "skip" or not air, extremely complex schedules may be handled very easily. When used with the audio cut start and end dates and as part of cut rotations, AXS will easily control sequences that have been extremely difficult in the past.
- Scheduling rule: If the field is blank, then the audio cut will run on all days that it is on the log or is part of a rotation.
- Day Restriction: Entering one or more day numbers for days of the week will automatically restrict the audio cut from playback on that day or days. The restricted days are treated in order, Monday through Sunday, days 1 through 7. Therefore if a single "2" is found in the field, the cut will not run on Tuesday. If the field has a "24" in it, then it will not run on Tuesday and Thursday. Order of the entry of the days is not significant. Entry of a day 8 will restrict all days. This can be used as a temporary hold on the use of this cut. Careful use of this power skip day feature will finally allow you to always run the right spot(s) on the right day(s).
-
Include Code: This advanced feature can make any audio cut jock schedule sensitive and also toggle audio cuts in a rotation to play if their include code is activated.
- Link In/Out: (Future Use)
- Fade at EOM (Y/N) (Optional): When a "Y" is entered into this field, the selected audio cut will fade out at a predetermined rate. This rate is set through the EWC.INI file.
- Divert Drive (C-Z): Most AXS systems use a single hard drive for audio cut and data storage. However, it is possible to use several hard disks and assign a particular audio cut number to that drive. This process can be involved if several control room systems are using multiple hard drives for audio cut storage of music. Please consult AXS support before you do this.
- Schedule NBR (Number) (Optional): This is used to identify the schedule number which the audio cut or live copy is taken. This is required for the optional back interface from AXS to Super Log. This field is passed from the Traffic Interface to the AXS log, but will have to hand entered here for audio cuts that were not passed at that time. Also, some AXS reports may use this as a sorting field in the future.
- Length (Display Only): Shows the exact length of the audio cut in hours, minutes, seconds and hundredths of seconds.
- Sample (Sample Rate) (Display Only): Shows the sample rate for this audio cut. AXS allows variable sample rates for audio cuts. The system defaults to the sample rate set up in the EWC.INI file during setup.
Recording an Audio Cut
After creating or editing the cut index, the audio production can take place. Be sure that you have highlighted the cut number that you want to record or audition. Be sure that the cut index header has all the information necessary to identify your cut. Follow the sequence below:
- Entering Record Mode: Press (F7) or click the mouse on the Record button at the lower left of the screen to go into the record mode. The record start box will appear above the VU Meter section. In addition, the VU meters will become active for level set and any audio will be passed through to the monitor speakers. (pic)
NOTE: If you enter the record mode on an existing audio cut and escape prior to actually recording, the existing audio file will not be altered.
- Set Level: When audio is fed into the AXS inputs from the recording source, the on-screen VU meter can be used to monitor the incoming level. Adjust your levels from the dubbing source so that the indicator is near the 100% point (where the green and red lines meet).
- Start Recording: There are two ways to start recording: A window on the screen offers these choices:
(pic)
- Start on Audio: If you want to begin recording on "audio", then close your audio input pots, press the (A) key on the keyboard, then start the audio. At the instant the system "senses" audio, recording will begin. Press (F6) to stop recording.
- Start NOW: When you are ready to record, press the (space). When the audio is done, then press (F6) or (space) again to stop.
WARNING!
Never peak over zero db! Digital audio is level critical. Over modulation will cause a very bad sound from the system. If you feed the AXS system input audio channels from the console, the "zero" level output at the console should actually be about -3 db to avoid over-driving the AXS audio device.
NOTE: You will need to practice a little to get the "rhythm" and "timing" to make good, tight dubs or original production. It's just like working with any new device that has an unfamiliar set of buttons. Once you get the hang of it, it's no harder than using any other recording device.
Playing and Audio Cut
After the recording is done, or if you just want to listen to any audio cut, press (F5). If you wish to stop the audio cut play back before it is finished, press (F6), click the STOP button or press the (space). If you wish to stop the audio playback on a specific device, press (CTRL+SHIFT) and (F1), (F2), (F3), or (F4) keys. The device status lights may be used to determine which card is currently in use. Red indicates that the card is active.
Cut Index Utility Keys
The keyboard function keys (F1) through (F12) ad more features to the Production screen. Here is a quick description of the keys and their function:
(pic)
- Transfer: After an audio cut has been created or edited in a system that has separate control room and production room computers, it is necessary to be able to transfer the audio cut to the other machine or machines. This can be done by recording the audio cut onto floppy disk, thumb drive, etc. ("sneaker net") or by passing it across the LAN. To transfer an audio cut, press the transfer button or the (F2) key. A transfer window will appear with a list of your options. To transfer an audio cut while in the overlay Production screen, the system but be in a stopped status. (pic)
After selecting the transfer option you wish to use press (enter) and the destination window will appear with another options menu. The options listed on this menu are determined by selections entered in the ProdPath.INI file. Select the desired destination option and once again press (enter). (pic)
The items on these menus allows complete flexibility in the movement of important data and in the maintenance of the cut indexes headers and sound files. When AXS was set up each machine received a predetermined location and "name" on the LAN.
If a LAN is not being utilized, then data like cut indexes or audio cuts (sound files) may be copied to or loaded from floppy disk, thumb drive, etc. However, this form of operation is limited by device size and is very limited in its practicality.
WARNING: We do not recommend (therefore support) the use of floppy disks, thumb drives, etc. for this kind of operation except in emergencies and will not be responsible for operational errors or limitations.
- Find: Pressing this button or the (F3) key displays a prompt that starts a search for a specific description match in the cut index. (pic)
- Play End: When an audio cut is in play mode, pressing this button or the (F4) key will automatically play the last 5 seconds of the audio cut.
- Delete (Audio Cuts): This is a utility allows the deletion of both a cut index header and a sound file. If there are copy and/or live tags attached to this cut or if the cut is write protected, then a warning is issued so that they are not destroyed by mistake. There is no way in the AXS system to do a mass delete of audio cuts as this is far too dangerous and might cause destruction of all the audio cuts in the system if mistakes were made. (pic)
- Info: Pressing this button or the (F11) key will display two boxes with information about the amount of hard disk space that remains on your drive and the number of rotators that contain the cut currently being highlighted. It is important to check the disk space periodically as you do Production because of the large amount of space consumed by audio cuts. (pic)
- B-Buss Sel: AXS systems that are connected to the optional AS-28 routing switcher will need to select a channel (1-8) for audio input. This is accomplished by pressing this button or the (F12) key and then entering the channel number into the window. (pic)
Cut Rotation Tables
Most stations find that it is necessary or desirable to be able to deal with digital audio cuts in groups rather than as individual cuts when they are scheduled on a log for air play. For example, it is much easier to specify just one cut number for an ID or liner set rather than going to the trouble of placing each individual cut on the log.
In addition, the use of rotation cut index numbers for spots allows some very sophisticated control of copy flights that will eliminate a lot of hand work and the possibility of errors.
- Sample Rotation Table using day-specific Audio Cuts: Assume that audio cuts 2005-2007 are linked together by rotation cut index number 0501 into a standard rotation that plays cut 2005, then cut 2006, then cut 2007 and then back to cut 2005.
| Cut # |
Cut Title |
Type |
|
|
| 0501 |
Sears Weekend Rotation |
RT |
(Rotation Index - No Audio Cut) |
|
| 2005 |
Sears #1 (Wed-Fri ONLY) |
CM |
(Audio Cut) |
|
| 2006 |
Sears #2 (Wed-Fri ONLY) |
CM |
(Audio Cut) |
|
| 2007 |
Sears #3 (Saturday ONLY) |
CM |
(Audio Cut) |
|
Remember, however, that cut 2007 is allowed by its "skip days" set up to play SATURDAY only and that cuts 2005 and 2006 are allowed by their "skip days" set up to play Wednesday through Friday only.
When the 0501 cut rotation runs on the air, a curious and wonderful thing will happen. Because AXS always checks for the "skip days", on every audio cut, the Saturday cut (2007) will be ignored Wednesday through Friday. The Wednesday through Friday cuts will not play on Saturday. So finally, the age-old problem of getting the right spots on for the right days is solved. Just load them up for the flight and go. Even through the spot flight may run several weeks, the right spots will always run at the right time, every time!
Another extension of this approach is to include any number of spots into the rotation table and let them rotate on the basis of legal date ranges (start date and end date). This, coupled with the "skip days" restriction can make an enormously powerful package.
- Rotation Tables in Jock Schedules: It is perfectly acceptable to make jock rotations for liners, ID's, jingles, "magic calls", etc. using the "skip day" and "include" codes. This gives great variety to the satellite programming and avoid repetition. Remember, however, that these rotations are "hidden" within the jock schedules and if there are problems they may not always be easily found until someone remembers that this is a programmed element.
If spot rotations for commercials are set up and not kept up to date, the system will finally fall through to a "sub" table. If a valid "sub" file cannot be found, then AXS will fill. This is especially important in SAT Mode for accurately covering local breaks.
PROPER SET UP AND MAINTENANCE OF "SUB" TABLES IS CRITICAL!
NOTE: When checking the length of the audio cut that is to be substituted for, if the cut is not exactly one of the lengths in the table above, the substitute table will look for the next length value, either higher or lower depending upon how "close" the length is to the next value.
NOTE: Regular "Sub" tables are "jock schedule sensitive", if suitable include codes are used.
  - The substitution rotation numbers are arranged like this:

     Cut #460 - Substitutes for LESS than 10 second audio cuts.
     Cut #461 - Substitutes for 10 to 15 second illegal audio cuts.
     Cut #462 - Substitutes for 20 second illegal audio cuts.
     Cut #463 - Substitutes for 30 second illegal audio cuts.
     Cut #464 - Substitutes for 40 second illegal audio cuts.
     Cut #465 - Substitutes for 50 second illegal audio cuts.
     Cut #466 - Substitutes for 60 second illegal audio cuts.
     Cut #467 - Substitutes for 70 second illegal audio cuts.
     Cut #468 - Substitutes for 80 second illegal audio cuts.
     Cut #469 - Substitutes for 90 second illegal audio cuts.
- Displaying a Cut Rotation Table: From the Production cut index, select a rotator number (0500-1999) by typing the number directly or by scrolling the highlight bar to the rotator and press (enter). The rotator header will be displayed. You must fill in the header information prior to entering any rotation cuts. The information required is Description, Cut Type, Start Date, and End Date. You may use this window to enter up to 50 audio cut numbers (2000 and up) in any order. Audio cuts aired from rotator tables take full advantage of all the special features of the cut itself and is a way that the cut "skip day" and "include" features can be used to their best advantage.
(pic)
- Entering a Cut number into a Rotation: After you have finished with the header information, type in an audio cut number (2000-9999) into the first table location and press (enter). To ensure that the cut number you have entered is correct, use the (up) key to highlight the cut and then look at the "current edit:" line near the bottom of the screen. The cut number, cut description, cut length, start date, and end date will be displayed. If it is correct, then press (enter) and move on to the next item in the table or (esc) to leave.
NOTE: Cuts may be entered in any sequence, but you must fill the first table (1-10) prior to entering any cut numbers into any other table. Don't worry about leaving spaces in the table, when the table is saved it will automatically condense into the correct form. You may also change the order in which the cuts will play by using the (space) to select the "next" cut to play in the rotation (the current next to play cut will be yellow in color) from this screen. You may also use (CTRL+D) to delete a cut or (CTRL+I) to insert a cut into the list.
- Auditioning a Rotator Cut: Once an audio cut number has been entered into the rotation table, systems with an independent production audio device installed may listen to or "audition" the highlighted cut by pressing (F5). Pressing (F6) to stop the audio cut.
Creating Macros
Macros are a very powerful tool for creating complex repeatable lists of events that may be called from the log or through the RTS with a single instruction or cut number. Macros are ideal for handling complex switching from one audio network to another, for involved transitions from music to satellite or vice versa, and for a special group of real-time events that must be executed with precision. Macros can be in rotations on jock schedules, Jock F/X, and Quick F/X too. Essentially a macros is a "mini-log" that can have up to 20 events, allowing a complex series of events to be run by AXS with only one cut index number being required on the AXS log or in the RTS. In general, anything that can be run on a regular log may be a part of a macro and a macro can be used any number of times. Cut index number 0400 through 0449 are reserved for use a macro cuts. (pic)
Limitations on MACRO sequences
Macros are extremely flexible and powerful. However, inventive users may be able to create macro sequences that are "impossible" for the system to handle. We do not imply or guarantee that any conceivable macro will work simply because it is entered into the macro sequence. If it doesn't work, then try something else. Every digital control system has limitations.
(pic)
Fill out the descriptive macro name, cut type, start date, and end date. You may then enter up to 20 events of almost any kind. You may enter actual cut numbers, rotator cuts, pauses, time announce calls and any legal control cut numbers in any order. Macros may also be placed in the RTS real-time schedule jock call field and may be used as a digital audio control cut.
(pic)
- Macro Exit: Leave the macro with a control cut or cosmetic space (0011) at the end of the last cut in the macro. Press (esc) to return to the cut index display.
Live Copy Text
Live copy is a very powerful tool for those stations utilizing the live mode of AXS. With this feature you can create your own commercial copy and assign it to a cut number or you may add the copy to an existing digital audio cut for added flexibility. You may want to time the reading of your copy and enter this information into the time field so that when the copy reaches the top play panel, the timer will start a count down that can be used by the jock for pacing. This feature may also be used in the production of text for weather reports, news, sports, or anywhere text can be used as an aid to enhance the presentation.
Creating Live Copy
To create copy, you must be in Production. Once you are in Production use the following steps to create your copy:
- From the cut index, select the cut number that you wish to use for your copy.
- Press (enter) to call up the cut index header window.
(pic)
- If the header is for an existing audio cut, just change the TYPE to CP for copy.
- If the header is for an open audio cut and therefore is blank, fill in the description, time (if known), type (CP), start date, end date, and skip days fields.
NOTE: You must (enter) through all fields whether or not changes are made for the header to be accepted.
- Press (esc) to close the header window.
- Press (C) to open the copy window and start entering your copy. When finished entering copy press (esc) to close the copy window and return to the cut index.
(pic)
- You may now schedule your copy on your log.
Deleting Copy
The time may arise when you feel it is necessary to delete copy from your cut numbers. To accomplish this, go to Production and perform the following actions: (pic)
- From the cut index, select the cut number containing the copy you wish to delete.
- Press (F2) to open the Transfer window. (pic)
- Select Delete Copy from the menu and press (enter).
- The Transfer window will be replaced by a Destination window.
- From the Destination window, select the computer you wish to delete the copy from and press (enter). (pic)
- The copy will be deleted from the selected computer. If you are on a network and the copy exists on other computers within the network, you must repeat this procedure for each computer.
Live Tags
Live tags can be a great way to expand your ability to use your commercial cut by allowing the jock to add additional information to the end of a spot. The same rules that apply to live copy also apply to live tags. The big difference is that you are limited in how much copy you may enter into the tags window.
Creating Live Tags
To create tags, you must be in the Production screen. Once you are there, use the following steps to create tags:
- From the cut index, select the cut number that you wish to create or edit a tag for.
- Press (T) to open the Tag window. (pic)
- Enter your tag copy as you wish it to be read.
- Press (esc) when you have finished entering the tag.
- Press (enter) to open the cut index header window and then press (esc). This will place a check mark in the tag column of the cut index for this cut number and lock the tag.
Deleting Live Tags
When the need to delete a tag arises, go into Production and accomplish the following actions:
- From the cut index, select the cut number containing the tag you wish to delete.
- Press (F2) to open the Transfer menu.
- Select Delete Tag from the menu and press (enter).
- The Transfer window will be replaced by the Destination window.
- From the Destination window, select the computer you wish to delete the tag from and press (enter).
- The tag will be deleted from the selected computer. If you are on a network and the tag exists on other computers within the network, you must repeat this procedure for each computer.
Production Cut Index and Text Maintenance Feature
AXS has a special feature in Production that allows a station to install a limited production capability on any computer not having audio devices that is connected to the LAN. It is limited in that you will only be able to perform maintenance on copy text and tag text. This feature is accessed in the same way as the standard Production screen, but the record/play section is disabled and the (F4) / Play End, and (F12) / B-Bus Sel Utility keys are inactive. The remaining utility keys however are available for use.
(pic)
WARNING: Because of the potential for abuse, careful consideration must be given as to what computer(s) will have this feature installed. It IS NOT a passworded feature and as such access to computers with this feature installed must be controlled. Shiny Stone Digital IS NOT responsible for any damage or destruction to the station cut index or text files caused by misuse and/or abuse of this feature by unauthorized station personnel.
AXS Cut Index Reservation Guide
Please copy this for use as you work with your AXS system.
0001 AXS Index Header Identifier
0002 Solo Mode (plays jock calls only, but no log plays)
0003 Reserved
0004-0009 Spot Avails
0010 Form Feed
0011 Cosmetic Place
0012 Reserved
0013 Music Mode
0014 Satellite Mode
0015 Live Assist Mode
0016-0020 Time Announce for jock in jock type JX or DC = Scheduled Jock
0021-0028 Switcher 1 Channels 1 to 8 ON
0029 Switcher 1 All Channels ON
0030 AXS Cosmetic Space
0031-0038 Switcher 1 Channels 1 to 8 OFF
0039 Switcher 1 All Channels OFF
0040-0050 Reserved
0051-0070 Cluster Markers (MK or MF)
0071-0075 Must Fill Variable Length Cluster Markers
0076 Reserved
0077 Traffic Seg Markers Toggle
0078 Do Not Return to Satellite Audio
0079 Not not Seg to Log Event from Macro
0080 Seg to Next Log Event from Macro
0081 Start (F5)
0082 Stop (F6)
0083 Sweep (F7)
0084 Reboot Computer
0085 CMOS Clock Slave
0086 System EOM Output (1/2 sec)
0087 Screen Saver Set #1 (00:00 sets it to OFF)
0088 Screen Saver Set #2 (00:00 sets it to OFF)
0089 Reserved
0090 Log Update Forward
0091 Log Update Closest
0092-0100 Reserved
0101-0110 Pause Cuts
0111 Reset Computer Clock
0112-0126 Music Avail Category
0127-0130 Reserved
0131-0138 Aux 1 to 8 ON
0139 Aux All On 1 to 8
0140 Reserved
0141-0148 Aux 1 to 8 OFF
0149 Aux All Off 1 to 8
0150 Reserved
0151-0158 Aux 9 to 16 ON
0159-0160 Reserved
0161-0169 Aux 9 to 16 OFF
0169-0170 Reserved
0171-0178 B-Buss 1 Channels 1 to 8 ON
0179 B-Buss 1 Al Channels OF
0180 Reserved
0181-0188 B-Buss 2 Channels 1 to 8 ON
0189 B-Buss 2 All Channels OFF
0190-0200 Reserved
0201-0216 Simulated AUX Inputs 1 to 16
0217-0220 Reserved
0221-0228 Switcher 2 Channels 1 to 8 ON
0229 Switcher 2 All Channels ON
0230 Reserved
0231-0238 Switcher 2 Channels 1 to 8 OFF
0239 Switcher 2 All Channels OFF
0240-0280 Reserved
0281-0296 Jock Call Emulators 1 to 16
0297-0299 Reserved
0300-0349 Log Titles
0350-0449 Macros (20 steps each)
0450-0459 Jock Substitute Spots
0460-0469 Commercial Substitutes
0470-0479 Promo Substitutes
0480-0489 Spot Set Fill Spots
0490-0499 Reserved
0500-1999 Rotation Tables (50 cuts each)
2000-9999 Digital Audio Cuts (CM, HD, etc.)
Reserved Cut Types
| Type |
Description |
Notes |
| AL |
Audio Length |
Use with Audio Cuts (Except HD Music) |
| CM |
Commercial Message |
Cuts 2000 and up (Selects standard sub fills) |
| CD |
CD Music Track |
|
| CP |
Copy (No Audio Cut) |
Cuts 2000 and up |
| DC |
Device Control |
Cuts less than 0050 |
| FX |
Sound Effects |
Cuts 2000 and up (suggested) |
| HD |
Hard Disk Music Track |
Cuts 2000 and up (intro time count down enabled) |
| HL |
Audio Length |
Use with Hard Disk Music Only |
| ID |
Station ID |
(On AXS Log) |
| JG |
Jingle |
Cuts 2000 and up (suggested) |
| LD |
Load Next Days Log |
Cut 0003 |
| LN |
Liner Call |
(On AXS Log) |
| LV |
Live |
Cuts 0200 to 0499 |
| LI |
Link Intro |
Link Code (CD Musing Intro) |
| LO |
Link Outro |
Link Code (CD Music back announce) |
| MC |
Macro Call |
Cuts 0080-0100 |
| MF |
Must Fill |
Cuts 0051-0075. Option to Must Fill the spot set. |
| MG |
Magic Call |
(On AXS Log) |
| MK |
Marker Cut/Title |
Cuts less than 0500 |
| MU |
Music |
Cuts 2000 and up |
| NW |
News |
Copy |
| PR |
Promo |
Cuts 2000 and up (selects special sub spots) |
| RC |
Record To Cut Number |
Cuts less than 0200 |
| RT |
Rotation Table Cuts |
Cuts 0500-1999 |
| SP |
Sports |
Copy |
| SU |
Substitute Cut |
From Sub Rotation Tables |
| WE |
Weather |
Copy |
The most important cut types are the CM (commercials), PR (promos), RT (rotator), MF (must fill) and MK (markers). Most of the control cuts will have been loaded onto your system during setup and will be used only if program changes are necessary. New additions may be made in the future.
Chapter 4 - Extended Features
Chapter 5 - Optional Features
Appendix 1 - Sample AXS Files
Appendix 2 - Master Log Setup
Appendix 3 - AXS Satellite Programming
Appendix 4 - AXS System Maintenance
Appendix 5 - Using a LAN
Appendix 6 - Using Multiple Switchers with AXS
Appendix 7 - Using Intro/Outro Link Codes with AXS
Appendix 8 - Power-Fill Programming Aid for AXS